Tuesday, 15 November 2022

Project - August 2022 - Deli App - Theme Security

    Deli Foods is an Emerging Restaurant business with presence all over the United States designs.

They currently have a legacy web Application Written in Java and hosted by their private server : https://project-deliapp.s3.us-east-2.amazonaws.com/DeliApp/src/main/webapp/index.html

It usually takes 5hrs to update their application and updates are manual, which incurs alot of downtime and is affecting their business because clients get locked out which gives their competitors upper hand.


Your Task is to migrate this Application into the cloud and implement Devops Practices to their entire Software Development Life Cycle

You should show concepts that implement Plan --Code--Build--Test--Deploy--Monitor


TASK A - Documentation: Setup a Wiki Server for your Project (Containerization)

a.

You can get the docker-compose file from below link

https://github.com/bitnami/bitnami-docker-dokuwiki/blob/master/docker-compose.yml 

Or

Use the below command on your Terminal to get the Yaml code and create a Docker Compose File

curl -sSL https://raw.githubusercontent.com/bitnami/bitnami-docker-dokuwiki/master/docker-compose.yml

b. mount your own Data Volume on this container

Hint: by modifying the Docker Compose file eg.


c. Change default port of Wiki Server to be running on Port 84

d. Change the default User and password

 to 

         Username: DeliApp

         Password:  admin

hint: Use the official image documentation to find details to accomplish all this

https://github.com/bitnami/bitnami-docker-dokuwiki

TASK A  Acceptance Criteria: 

i. The Wiki Server should be up and running and serving on 84

ii. Mount your own container volume to persist data

iii. Login with Credentials DeliApp/admin


TASK B: Version Control The DeliApp Project

Plan & Code

App Name: DeliApp

  • WorkStation A- Team PathFinders- 3.15.209.165
  • WorkStation B - Team Goal Diggers- 3.143.221.53
  • WorkStation C- Team Fantastic 4- 3.144.208.46
  • WorkStation D- Team PracticeToPerfect- 3.131.152.227
Developer Workstations are windows machines, Your Project Supervisor will provide you their ip/dns and credentials you will use to log into the machine assigned to ur group: You can use Mobaxterm or RemoteDesktop to connect. The Username is Administrator

When you access the Developer workstation assigned to your group, you will find the code base in the below location:
This PC:---->Desktop---->DeliApp


(You can use Github or Bitbucket )- 

1) Set up 2 repos, a Build Repo to store all the code base and a Deployment Repo to store all your deployment scripts and name them accordingly as you see below(in green): 

  • Build repo : DeliApp_Build  --->Developers Access
  • Deployment repo: DeliApp_Deployment   --->-Your Team Access

2)Version control the DeliApp project located in the Developers WorkStation to enable the Developers migrate their code to the Source Control Management Tool(Bitbucket/Git)

  • Set up Developers workstations ssh-keys in bitbucket to access Build Repo and Your Team(Devops) workstation ssh-keys in bitbucket to access the Deployment Repo

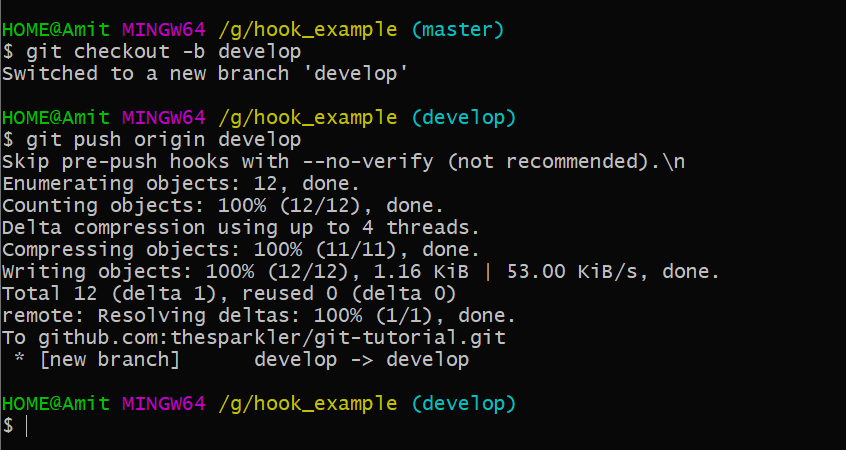
3)Git branching Strategy for DeliApp_Build

  • master
  • release: eg    release/release-v1
  • feature:   eg  feature/feature-v1
  • develop

4)Git branching Strategy for DeliApp_Deploy

  • master
  • feature eg feature/feature-v1
  • develop


5. Secure the Repos by Installing git-secrets on your build( DeliApp_Build )and deployment (DeliApp_Deploy )repo --PRE-COMMIT HOOK

6. Prevent the developers and your Team from pushing code directly to master by installing PRE-PUSH HOOK

TASK B Acceptance Criteria: 

1. You should be able to push and pull code from the Developer Workstation assigned to your Team to the DeliApp_Build repo in Source Control Management(SCM) 

2. Your Team (Devops) Should be able to pull and push code from your individual workstations to the DeliApp_Deploy repo

3. Demonstrate the git branching Strategy

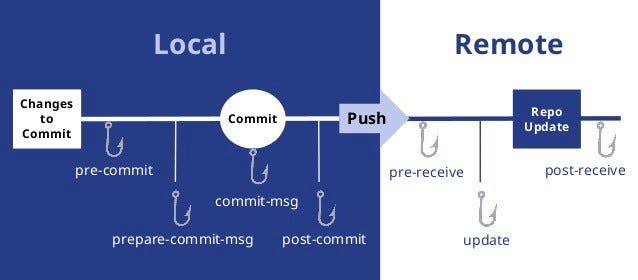
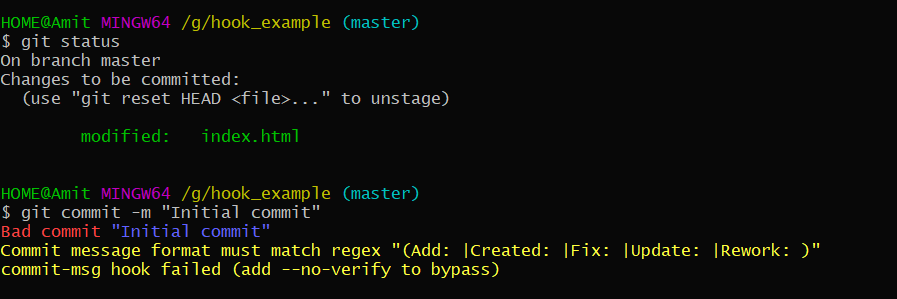
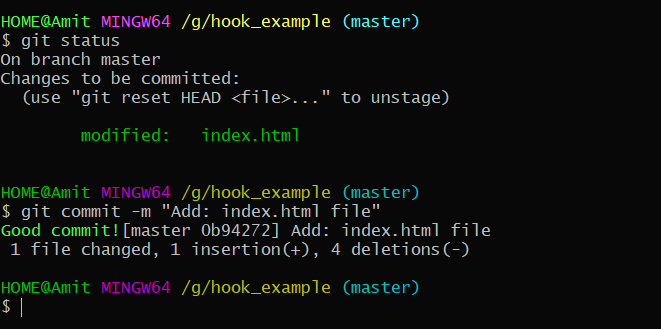
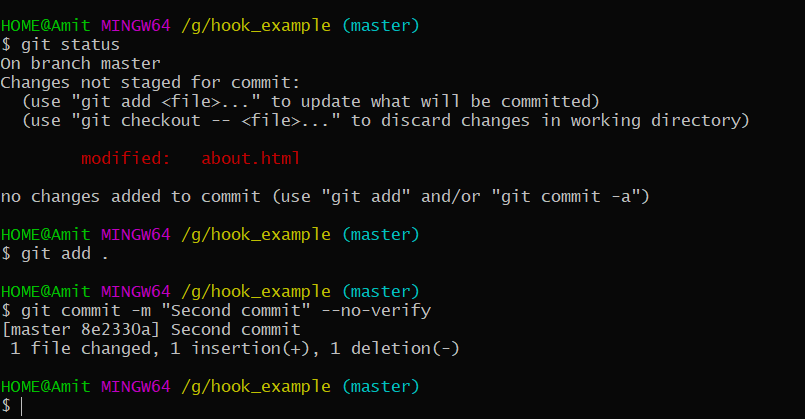
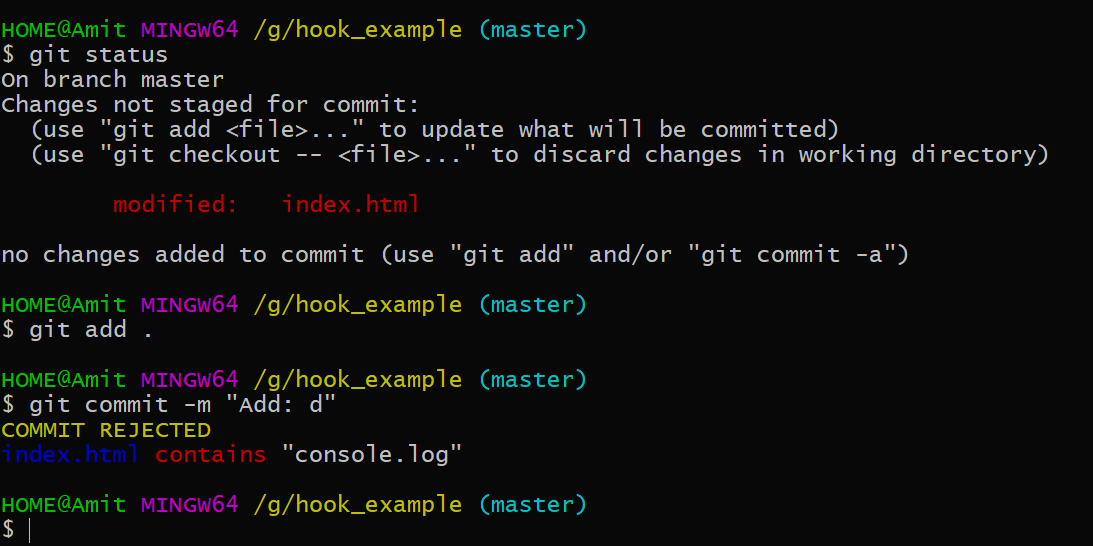
4. Your git commit should should throw an error when there is a secret in your repo

Hint: Add a text file containing some secrets eg. aws secret key/access key and commit

5. You should get an Error when you try to push to master


    TASK C: Set up your Infrastructure

    1. Set up your Environment: DEV, UAT, QA, PROD A, PROD B

    Provision 6 Apache Tomcat Servers (You can use Any IAC Tool(Terraform, Cloud Formation, Ansible Tower)You can host this use any cloud provider - Aws, Google Cloud, Azure

    i. DEV - t2micro -8gb

    ii. UAT(User Acceptance Testing)- t2small -10gb

    iii. QA(Quality Assurance) - T2Large-20gb

    iv. PROD A- T2Xlarge-30gb

    v. PROD B- T2xLarge-30gb

    Apache Tomcat Servers should be exposed on Port 4444

    Linux Distribution for Apache Tomcat Servers: Ubuntu 18.04

    Note: When Bootstrapping your servers make sure you install the Datadog Agent

    2. Set up your Devops tools servers:

    (These can be provisioned Manually or with IAC Tool, Be Free to use any Linux Distributions on theses eg Linux 2, Debian, Ubuntu,etc)

    1 Jenkins(CI/CD) t2 xlarge 20gb

    1 SonarQube(codeAnalysis) t2small 8gb

    1 Ansible Tower T2xxl- 15gb

    1 Artifactory Server T2xxl - 8gb

    1 Vulnerability Scanning Tool Server- Owasp Zap (Install in a Windows instance) See: https://www.devopstreams.com/2022/06/getting-started-with-owasp-zap.html

    1 Kubernetes Server-You can use EKS, k3s,kubeadm or minikube(Note your kubernetes can be installed in your Jenkins 

    TASK D: Monitoring

    a. Set up continuous monitoring with Datadog by installing Datadog Agent on all your servers

     Acceptance criteria: 

     i All your infrastructure Sever metrics should be monitored(Infrastructure Monitoring)

    ii All running Processes on all your Servers should be monitored(Process monitoring)

    ii Tag all your servers on the Datadog dashboard

    TASK E: Domain Name System

    a. Register a Domain for your Team

    i. You can use Route 53, Godaddy or any DNS service of your choice 

    eg. www.team-excellence.com


    TASK F: Set Up Automated Build for Developers 

    The Developers make use of Maven to Compile the code

    a. Set up a C/I  Pipeline in Jenkins using Jenkinsfile 

    b. Enable Webhooks in bitbucket to trigger Automated build to the Pipeline Job

    c. The CI Pipeline job should run on an Agent(Slave)

    d. Help the developers to version their artifacts, so that each build has a unique artifact version

    Tips: https://jfrog.com/knowledge-base/configuring-build-artifacts-with-appropriate-build-numbers-for-jenkins-maven-project/


    Pipeline job Name: DeliApp_Build

    Pipeline should be able to checkout the code from SCM and build using Maven build tool, Provide code analysis ,codecoverage with sonarqube and upload artifacts to artifactory, and also send email to the team and provide versioning of artifacts

    Pipeline should have slack channel notification to notify build status


    i. Acceptance Criteria:

     Automated build after code is pushed to the repository

    1. Sonar Analysis on the sonarqube server

    2. Artifact uploaded to artifactory

    3. Email notification on success or failure

    4. Slack Channel Notification

    5. Each artifact has a unique version number

    6. Code coverage displayed

    TASK G: Deploy & Operate (Continous Deployment)

    a. Set up a C/D pipeline in Jenkins using Jenkinsfile

    create 4 CD pipeline jobs for each env (Dev,Uat, QA,Prod) or 1 pipeline that can select any of the 4 enviroments

    Pipeline job Name:eg DeliApp_Dev_Deploy


    i. Pipeline should be able to deploy any of your LLE (Dev, Uat, Qa) or HLE (Prod A, PROD B) 

    You can use DeploytoContainer plugin in jenkins or Deploy using Ansible Tower to pull artifact from artifactory and deploy to either  Dev, Uat , Qa or  Prod

    ii. Pipeline should have slack channel notification to notify deployment status

    iii. Pipeline should have email notification

    iv. Deployment Gate

    1. Acceptance criteria:

    i. Deployment is seen and verified in either Dev, Uat, Qa or Prod

    ii. Notification is seen in slack channel

    iii. Email notification

    TASK H:a.  Deployment and Rollback

    a. Automate the manual deployment of a Specific Version of the Deli Application using Ansible Tower

    Manual Deployment Process is Below:


    step 1: login to tomcat server

    step 2 :download the artifact

    step 3: switch to root

    step 4: extract the artifact to Deployment folder 

    Deployment folder:  /var/lib/tomcat8/webapps

    Use service id : ubuntu


    Acceptance Criteria:

    i. Deploy new artifact from artifactory to either Dev, Uat, Qa or  Prod

    ii. Rollback to an older artfact from Artifactory either to Dev, Uat, Qa or Prod

    iii. All credentials should be encrypted

    TASK H:b.  Domain Name Service and LoadBalancing

    i. Add an application or Elastic Loadbalancer to manage traffic between your ProdA and Prod B Servers

    ii. Configure your DNS with Route 53 such that if you enter your domain eg www.team-excellence.com it direct you to the LoadBalancer that will inturn point to Prod A or Prod B

    Acceptance criteria: 

    i. Your team domain name eg www.mint.com will take you to your application that is residing on Prod A or Prod B


    TASK I: 

        a. Set Up A 3 Node kubernetes Cluster(Container Orchestration) with Namespace dev,qa,prod

    • Using a Jenkins pipeline or Jenkins Job  -The pipeline or job should be able to Create/Delete the cluster

       b. Dockerize the DeliApp

    • You can use a Dockerfile to create the image or Openshift Source to image tool 
      c. Deploy the Dockerized DeliApp into the prod Namespace of the cluster(u can use dev and qa          for testing)
     d. Expose the application using a Load balancer or NodePort
     e.  Monitor your cluster using prometeus and Grafana
     TASK I Acceptance Criteria: 

    1. You should be able to create/delete a kubernetes cluster

    2. Be able to deploy your application into any Namespace(Dev,Qa,Prod)

    3. You should be able to access the application through Nodeport or LoadBalancer

    4. You should be able to monitor your cluster in Grafana

    TASK J: Demonstrate Bash Automation of 

    i. Tomcat

    ii. jenkins

    iii. Apache


    Acceptance criteria: 

    1. Show bash scripts and successfully execute them


    Saturday, 30 July 2022

    How to install K3s

    Step 1: Update Ubuntu system

    Update and upgrade your system

    sudo apt update && sudo apt -y upgrade
    sudo reboot

    Step 2: Install Single Node k3s Kubernetes

    We will deploy a single node kubernetes using k3s lightweight tool. K3s is a certified Kubernetes distribution designed for production workloads in unattended, resource-constrained environments. The good thing with k3s is that you can add more Worker nodes at later stage if need arises.

    K3s provides an installation script that is a convenient way to install it as a service on systemd or openrc based systems

    Let’s run the following command to install K3s on our Ubuntu system:

    curl -sfL https://get.k3s.io | sudo bash -
    sudo chmod 644 /etc/rancher/k3s/k3s.yaml

    Installation process output:

    [INFO]  Finding release for channel stable
    [INFO]  Using v1.21.3+k3s1 as release
    [INFO]  Downloading hash https://github.com/k3s-io/k3s/releases/download/v1.21.3+k3s1/sha256sum-amd64.txt
    [INFO]  Downloading binary https://github.com/k3s-io/k3s/releases/download/v1.21.3+k3s1/k3s
    [INFO]  Verifying binary download
    [INFO]  Installing k3s to /usr/local/bin/k3s
    [INFO]  Creating /usr/local/bin/kubectl symlink to k3s
    [INFO]  Creating /usr/local/bin/crictl symlink to k3s
    [INFO]  Creating /usr/local/bin/ctr symlink to k3s
    [INFO]  Creating killall script /usr/local/bin/k3s-killall.sh
    [INFO]  Creating uninstall script /usr/local/bin/k3s-uninstall.sh
    [INFO]  env: Creating environment file /etc/systemd/system/k3s.service.env
    [INFO]  systemd: Creating service file /etc/systemd/system/k3s.service
    [INFO]  systemd: Enabling k3s unit
    Created symlink /etc/systemd/system/multi-user.target.wants/k3s.service → /etc/systemd/system/k3s.service.
    [INFO]  systemd: Starting k3s

    Validate K3s installation:

    The next step is to validate our installation of K3s using kubectl command which was installed and configured by installer script.

    $ kubectl get nodes
    NAME        STATUS   ROLES                  AGE   VERSION
    ubuntu-01   Ready    control-plane,master   33s   v1.22.5+k3s1

    You can also confirm Kubernetes version deployed using the following command:

    $ kubectl version --short
    Client Version: v1.22.5+k3s1
    Server Version: v1.22.5+k3s1

    The K3s service will be configured to automatically restart after node reboots or if the process crashes or is killed.

    Sunday, 19 June 2022

    How Automate Kubernetes/docker with jenkins (Installation)

     Step 1: Install Jenkins on Ubuntu 18.04 instance

    apt updateapt install openjdk-11-jre-headless -yjava -version


    curl -fsSL https://pkg.jenkins.io/debian-stable/jenkins.io.key | sudo tee \
      /usr/share/keyrings/jenkins-keyring.asc > /dev/null

    echo deb [signed-by=/usr/share/keyrings/jenkins-keyring.asc] \
      https://pkg.jenkins.io/debian-stable binary/ | sudo tee \
      /etc/apt/sources.list.d/jenkins.list > /dev/null


    Once the Jenkins repository is enabled, update the apt package list and install the latest version of Jenkins by typing:

    sudo apt-get updatesudo apt-get install jenkins

    systemctl status jenkins

    See link for complete configuration guide of jenkins : https://www.devopstreams.com/2020/08/pleasefollow-steps-to-install-java.html


    Step 2: Add Jenkins User to Sudoers List


    Now configured Jenkins user as administrator to do all operation and connect eks cluster.

    $ vi /etc/sudoers

    Add at end of file

    jenkins ALL=(ALL) NOPASSWD: ALL

    Save and exit

    :wq!


    Now we can use Jenkins as a sudo user


    sudo su - jenkins


    Step 3:

    Docker installation

    sudo apt install docker.io -y

    Once done you can check the version also.

    docker --version

    Now add Jenkins user in the docker group

    sudo usermod -aG docker jenkins

    Now we are installing aws CLI, kubectl, and eksctl command-line utility on the Jenkins server.

    Follow the below commands,

    Step 4:

    sudo apt  install awscli


    To configure the AWS the first command we are going to run is

    aws configure

    Then enter your Access/Secret key, Format: json and region:us-east-2


    Step 5:

    Install eksctl

     curl --silent --location "https://github.com/weaveworks/eksctl/releases/latest/download/eksctl_$(uname -s)_amd64.tar.gz" | tar xz -C /tmp

    sudo mv /tmp/eksctl /usr/local/bin

      eksctl version

    If you get something like "no command found" enter the below command

    cp /usr/local/bin/eksctl /usr/bin -rf

    Step 6:

    Install kubectl

     curl -o kubectl https://amazon-eks.s3-us-west-2.amazonaws.com/1.14.6/2019-08-22/bin/linux/amd64/kubectl

     chmod +x ./kubectl

    mkdir -p $HOME/bin && cp ./kubectl $HOME/bin/kubectl && export PATH=$HOME/bin:$PATH

    sudo mv ./kubectl /usr/local/bin

     kubectl version --short --client


    Step 7:

    Install aws-iam-authenticator

       curl -o aws-iam-authenticator https://amazon-eks.s3-us-west-2.amazonaws.com/1.14.6/2019-08-22/bin/linux/amd64/aws-iam-authenticator

        chmod +x ./aws-iam-authenticator

       mkdir -p $HOME/bin && cp ./aws-iam-authenticator $HOME/bin/aws-iam-authenticator && export PATH=$PATH:$HOME/bin

       echo 'export PATH=$PATH:$HOME/bin' >> ~/.bashrc

    sudo mv ./aws-iam-authenticator /usr/local/bin

       aws-iam-authenticator help


    Step 8: Make sure you Create a role with Administrator Access and attach your role to the instance

     Step 9: Create your jenkins job --->Build Enviroment---->Execute Shell---->enter your kubernetes commands

    Or

    Create Pipeline and run your commands in stages

    Thanks you


    Wednesday, 15 June 2022

    Git Hooks Simplified


    ABCs of All Hooks

    Today’s top companies give the highest priority to the quality of the code you have written. So, we have a concept of git hook which does not allow you to commit in “master branch” unless your code validation is accepted. I think it is helpful to maintain a better quality of code.

    If you’ve ever worked on an open-source project, or you’re working with a team, it’s very likely you’re using some kind of version control. Version Control System (VCS) has become one of the main requirements for any project, Git being the foremost popular one. However, as the team grows in number, it becomes difficult to handle the different code styles and to enforce certain rules across all the contributors. These issues aren’t noticed by a contributor until he has pushed his changes which end in overheads for the core maintenance team. To enforce these rules and validate the code being pushed, Git provides a great feature, called Git Hooks.

    So what are Git hooks?

    Git hooks are custom scripts that git executes before or after events such as commitpush. Git hooks are a built-in feature there is no need to download anything. They are unique and run locally and resides inside the .git/hooks directory.

    Git hooks can be used to:

    • Check commits for errors before they are pushed.
    • Ensure code meets project standards.
    • Notify team members about changes.
    • Push code into a production environment, and more.

    There are two types of hooks:

    • Client-Side (Local) Hooks
    • Server-Side (Remote) Hooks

    Server-Side Hooks, as the name suggests, are installed on the server and are triggered only just in case of network operations. For example — Post-Receive may be a sort of server-side hook triggered after a successful push. This makes it an ideal place to send notifications to all the contributors.

    e.g: pre-receive, update, post-receive

    1. The pre-receive hook is executed every time somebody uses git push to push commits to the repository.
    2. The post-receive hook gets called after a successful push operation.

    Client-Side Hooks reside on one’s local repository and are executed when a git event is triggered. Here, a git event can commit, push, rebase, etc. When we run certain git commands, git search for the hooks within the git repository to ascertain if there’s an associated script to run. For example, one could have a pre-push hook to validate that the code enforces certain rules before it’s pushed to the remote repository.

    e.g: pre-commit, prepare-commit-msg, commit-msg, post-commit

    1. The pre-commit script is executed every time you run git commit command.
    2. The prepare-commit-msg hook is called after the pre-commit hook to populate the text editor with a commit message. This is where auto-generated commit message is created.
    3. The commit-msg hook is much like the prepare-commit-msg hook, but it is called after the user enters a commit message.
    4. The post-commit hook is called immediately after the commit-msg hook. This is after a commit has taken place.

    In this image, we have different hooks name with their event (means which command executes which hook).

    Implementing Git Hooks

    Git hooks are a built-in feature that comes with every git repository. When initializing a new project git populates the hooks folder with template files.

    1. Navigate to the hooks directory
    $ ls .git/hooks/

    Notice the files inside, namely:

    sample files inside the hooks directory

    2. Install your hook

    To enable the hook scripts, simply remove the .sample extension from the file name. Git will automatically execute the scripts based on the naming. For my purpose, I renamed the “commit-msg.sample” file to “commit-msg”.

    3. Select a language to write your hook script.

    The default script files are written in shell scripts, but you can use any scripting language you are familiar with as long as it can be run an executable. This includes BashPythonRubyPerlRustSwift, and Go.

    Open up the script file in your code editor and define your language of choice in the first line, using the shebang (#!) sign, so git knows how to interpret the subsequent scripts. Note that you need to include the path of your interpreter. For Mac users who wish to write the scripts in Python, for instance, the Apple-provided build of Python is located in /usr/bin. So, the first line would look like:

    #!/usr/bin python

    If you want to use Bash, on the other hand, the first line would be:

    #!/bin/bash

    And for shell:

    #!/bin/sh

    4. Write your script

    From here on, you could write any script and Git will execute it before any commits to this project. For reference, I wrote my script in Bash, and here is what I ended with up.

    • commit-msg hook

    #!/bin/bash
    Color_Off='\033[0m'
    BRed="\033[1;31m" # Red
    BGreen="\033[1;32m" # Green
    BYellow="\033[1;33m" # Yellow
    BBlue="\033[1;34m" # Blue
    MSG_FILE=$1
    FILE_CONTENT="$(cat $MSG_FILE)"
    # Initialize constants here
    export REGEX='(Add: |Created: |Fix: |Update: |Rework: )'
    export ERROR_MSG="Commit message format must match regex \"${REGEX}\""
    if [[ $FILE_CONTENT =~ $REGEX ]]; then
    printf "${BGreen}Good commit!${Color_Off}"
    else
    printf "${BRed}Bad commit ${BBlue}\"$FILE_CONTENT\"\n"
    printf "${BYellow}$ERROR_MSG\n"
    printf "commit-msg hook failed (add --no-verify to bypass)\n"
    exit 1
    fi
    exit 0

    Let’s understand this script:
    • Line 3–7 define text-decoration variables, which are used to enhance my console message. For coloring the variables, I have used Git shell coloring.
    • Line 9–10 gets the commit message form the console.
    • Line 12–13 defines the REGEX pattern from which the commit message will be validated.
    • Line 14–21 is a conditional statement that will check the commit message if it matches with REGEX pattern then successful commit otherwise failed.
    • Notice that if the conditional above evaluates to a 1 status, line 19 extends that by exiting with a 1 status to indicate failure. This prevents changes from being commit.

    We have to give executable permission to our script file using the chmod command.

    $ chmod +x .git/hooks/commit-msg

    After writing your hook scripts, just sit back and watch Git do all the work:

    Let’s see the example below:

    1. Commit with an improper commit message
    Bad commit

    2. Commit with a proper commit message.

    Good commit

    3. If you want to bypass the commit-msg hook then use --no-verify flag.

    Bypass commit
    • pre-push hook

    #!/bin/sh
    echo "Skip pre-push hooks with --no-verify (not recommended).\n"
    BRANCH=`git rev-parse --abbrev-ref HEAD`
    if [ "$BRANCH" = "master" ];
    then
    echo "You are on branch $BRANCH. You must not push to master\n"
    exit 1
    fi
    if [ `date +%w` -ge 5 ] && [ "$BRANCH" = "develop" ];
    then
    echo "Please, do not push code to develop before the weekend!\n"
    exit 1
    fi
    Let’s understand this script:
    • Line 5 determines the current branch with git rev-parse --abbrev-ref HEAD.
    • Line 6–10 is a conditional statement, will check in which branch you are in. If you’re in the master branch then the script will not allow you to push code in the master branch. If not in master, then you can push.
    • Line 12–16 is also a conditional statement, will check your current branch and also check the date and week. If a week is greater than means you i.e Saturday and Sunday then the script will not allow you to push the code.

    This pre-push script has some advantages as well because in the IT industry who wants to work at the weekend, no one really? So, this hook prevents you to push code on a Friday night because it’s having a high chance to get an error when you pushed the code. So, it prevents that’s awesome!

    1. Error while pushing to the master branch.

    2. Successfully pushed to another branch on weekdays except for weekends.

    • pre-commit hook

    #!/bin/bash
    # Git Shell Coloring
    RESTORE='\033[0m' # Text Reset means no color change
    RED='\033[00;31m' # Red color code
    YELLOW='\033[00;33m' # yellow color code
    BLUE='\033[00;34m' # blue color code
    FORBIDDEN=( 'TODO:' 'console.log' )
    FOUND=''
    for j in "${FORBIDDEN[@]}"
    do
    for i in `git diff --cached --name-only`
    do
    # the trick is here...use `git show :file` to output what is staged
    # test it against each of the FORBIDDEN strings ($j)
    if echo `git show :$i` | grep -q "$j"; then
    FOUND+="${BLUE}$i ${RED}contains ${RESTORE}\"$j\"${RESTORE}\n"
    fi
    done
    done
    # if FOUND is not empty, REJECT the COMMIT
    # PRINT the results (colorful-like)
    if [[ ! -z $FOUND ]]; then
    printf "${YELLOW}COMMIT REJECTED\n"
    printf "$FOUND"
    exit 1
    fi
    # nothing found? let the commit happen
    exit 0
    While developing any software, at some point the developers have to debug the code to check the bugs or API response. If you are from the JavaScript background then developers mostly use “console.log()” statement to print something in console. Consider a scenario, where you have debugged the code and forget to remove those console.log()” statements and you’re ready to commit the changes. But, you don’t want those statements to commit. So, in that case, we can take the help of the pre-commit hook in which we have written a script will automatically check the code before commit. If the scripts found any “console.log()” statements then it will not allow you to commit. That’s amazing, right?                                                                                                               

    Let’s understand the code:                                                                                      The script uses the grep command to search for the forbidden strings like “TODO:” and “console.log()” in the staged codebase. If strings are found then abort the commit.                                                           Commit Rejected                                                                                                                                                                             Now, If we remove those statements commit will be accepted.                     
    Commit Accepted

    Be aware of the --no-verify option to git commit. This bypasses the pre-commit hook when committing.

    Prevents bad commit or push (git hooks, pre-commit/pre-commit, pre-push/pre-push, post-merge/post-merge, and all that stuff…)

    TASK C: Bare-Metal Deployment (Nginx on EC2) — Step-by-Step Guide

    Overview In this task, you will deploy the HealthPulse Portal the  traditional way  — static files served directly by Nginx on an EC2 instan...