DevOps Training Program that will provide you with in-depth knowledge of various DevOps tools including Git, Jenkins, Docker, Ansible, Puppet, Kubernetes and Nagios. This training is completely hands-on and designed in a way to help you become a certified practitioner through best practices in Continuous Development, Continuous Testing, Configuration Management and Continuous Integration, and finally, Continuous Monitoring of software throughout its development life cycle.
Prometheus is an open-source monitoring and alerting tool that collects and stores time-series data, while Grafana is a popular data visualization platform that allows you to create interactive dashboards and visualizations.
By combining these tools, you can gain valuable insights into your Kubernetes cluster’s performance and health, making it easier to identify and troubleshoot issues. However, setting up this stack can be a daunting task, especially if you’re not familiar with the process.
That’s why I’m excited to provide you with a comprehensive tutorial that will guide you through the entire process step-by-step, from installing k3s to configuring Prometheus and Grafana. With my tutorial, you’ll be able to install and configure this powerful monitoring stack in just 5 minutes, saving you a lot of time and effort
We may need some of these and possibly other resources in our application, which we'll have to create ourselves as templates.
For this tutorial, we'll create a deployment and service to expose that deployment. Please note that the emphasis here is not to understand Kubernetes in detail. Hence we'll keep these resources as simple as possible.
Let's edit the file deployment.yaml inside the templates directory to look like:
Now, with our knowledge of Kubernetes, these template files look quite familiar except for some oddities. Note the liberal usage of text within double parentheses {{}}. This is what is called a template directive.
Helm makes use of the Go template language and extends that to something called Helm template language. During the evaluation, every file inside the template directory is submitted to the template rendering engine. This is where the template directive injects actual values into the templates.
7.3. Providing Values
In the previous sub-section, we saw how to use the template directive in our templates. Now, let's understand how we can pass values to the template rendering engine. We typically pass values through Built-in Objects in Helm.
There are many such objects available in Helm, like Release, Values, Chart, and Files.
We can use the file values.yaml in our chart to pass values to the template rendering engine through the Built-in Object Values. Let's modify the values.yaml to look like:
However, note how these values have been accessed within templates using dots separating namespaces. We have used the image repository and tag as “hello-world” and “1.0”, this must match the docker image tag we created for our Spring Boot application.
8. Managing Charts
With everything done so far, we're now ready to play with our chart. Let's see what the different commands available in Helm CLI to make this fun are! Please note that we'll only cover some of the commands available in Helm.
8.1. Helm Lint
Firstly, this is a simple command that takes the path to a chart and runs a battery of tests to ensure that the chart is well-formed:
helm lint ./hello-world
==> Linting ./hello-world1 chart(s) linted, no failures
The output displays the result of the linting with issues that it identifies.
8.2. Helm Template
Also, we've this command to render the template locally for quick feedback:
Please note that this command fakes the values that are otherwise expected to be retrieved in the cluster.
8.3. Helm Install
Once we've verified the chart to be fine, finally, we can run this command to install the chart into the Kubernetes cluster:
helm install --name hello-world ./hello-world
NAME: hello-world
LAST DEPLOYED: Mon Feb 2515:29:592019
NAMESPACE: default
STATUS: DEPLOYED
RESOURCES:
==> v1/Service
NAME TYPE CLUSTER-IP EXTERNAL-IP PORT(S) AGE
hello-world NodePort 10.110.63.169 <none> 80:30439/TCP 1s
==> v1/Deployment
NAME DESIRED CURRENT UP-TO-DATE AVAILABLE AGE
hello-world10001s
==> v1/Pod(related)
NAME READY STATUS RESTARTS AGE
hello-world-7758b9cdf8-cs7980/1 Pending 00s
This command also provides several options to override the values in a chart. Note that we've named the release of this chart with the flag –name. The command responds with the summary of Kubernetes resources created in the process.
8.4. Helm Get
Now, we would like to see which charts are installed as what release. This command lets us query the named releases:
helm ls--all
NAME REVISION UPDATED STATUS CHART APP VERSION NAMESPACE
hello-world1 Mon Feb 2515:29:592019 DEPLOYED hello-world-0.1.01.0 default
There are several sub-commands available for this command to get the extended information. These include All, Hooks, Manifest, Notes, and Values.
8.5. Helm Upgrade
What if we've modified our chart and need to install the updated version? This command helps us to upgrade a release to a specified or current version of the chart or configuration:
helm upgrade hello-world ./hello-world
Release "hello-world" has been upgraded. Happy Helming!
LAST DEPLOYED: Mon Feb 2515:36:042019
NAMESPACE: default
STATUS: DEPLOYED
RESOURCES:
==> v1/Service
NAME TYPE CLUSTER-IP EXTERNAL-IP PORT(S) AGE
hello-world NodePort 10.110.63.169 <none> 80:30439/TCP 6m5s
==> v1/Deployment
NAME DESIRED CURRENT UP-TO-DATE AVAILABLE AGE
hello-world11116m5s
==> v1/Pod(related)
NAME READY STATUS RESTARTS AGE
hello-world-7758b9cdf8-cs7981/1 Running 06m4s
Please note that with Helm 3, the release upgrade uses a three-way strategic merge patch. Here, it considers the old manifest, cluster live state, and new when generating a patch. Helm 2 used a two-way strategic merge patch that discarded changes applied to the cluster outside of Helm.
8.6. Helm Rollback
It can always happen that a release went wrong and needs to be taken back. This is the command to roll back a release to the previous versions:
helm rollback hello-world1
Rollback was a success! Happy Helming!
We can specify a specific version to roll back to or leave this argument black, in which case it rolls back to the previous version.
8.7. Helm Uninstall
Although less likely, we may want to uninstall a release completely. We can use this command to uninstall a release from Kubernetes:
It removes all of the resources associated with the last release of the chart and the release history.
9. Distributing Charts
While templating is a powerful tool that Helm brings to the world of managing Kubernetes resources, it's not the only benefit of using Helm. As we saw in the previous section, Helm acts as a package manager for the Kubernetes application and makes installing, querying, upgrading, and deleting releases pretty seamless.
In addition to this, we can also use Helm to package, publish, and fetch Kubernetes applications as chart archives. We can also use the Helm CLI for this as it offers several commands to perform these activities. As before, we'll not cover all the available commands.
9.1. Helm Package
Firstly, we need to package the charts we've created to be able to distribute them. This is the command to create a versioned archive file of the chart:
helm package ./hello-world
Successfully packaged chart and saved it to: \hello-world\hello-world-0.1.0.tgz
Note that it produces an archive on our machine that we can distribute manually or through public or private chart repositories. We also have an option to sign the chart archive.
9.2. Helm Repo
Finally, we need a mechanism to work with shared repositories to collaborate. There are several sub-commands available within this command that we can use to add, remove, update, list, or index chart repositories. Let's see how we can use them.
We can create a git repository and use that to function as our chart repository. The only requirement is that it should have an index.yaml file.
We can create index.yaml for our chart repo:
helm repo index my-repo/ --url https://<username>.github.io/my-repo
This generates the index.yaml file, which we should push to the repository along with the chart archives.
After successfully creating the chart repository, subsequently, we can remotely add this repo:
There are quite a several commands available to work with the chart repositories.
9.3. Helm Search
Finally, we should search for a keyword within a chart that can be present on any public or private chart repositories.
helm search repo <KEYWORD>
There are sub-commands available for this command that allows us to search different locations for charts. For instance, we can search for charts in the Artifact Hub or our own repositories. Further, we can search for a keyword in the charts available in all the repositories we've configured.
10. Migration from Helm 2 to Helm 3
Since Helm has been in use for a while, it's obvious to suspect the future of Helm 2 with the significant changes as part of Helm 3. While it's advisable to start with Helm 3 if we are starting fresh, support for Helm 2 will continue in Helm 3 for the near future. Although, there are caveats, and hence will have to make necessary accommodations.
Some of the important changes to note include that Helm 3 no longer automatically generates the release name. However, we've got the necessary flag that we can use to generate the release name. Moreover, the namespaces are no longer created when a release is created. We should create the namespaces in advance.
But there are a couple of options for a project that uses Helm 2 and wishes to migrate to Helm 3. First, we can use Helm 2 and Helm 3 to manage the same cluster and slowly drain away Helm 2 releases while using Helm 3 for new releases. Alternatively, we can decide to manage Helm 2 releases using Helm 3. While this can be tricky, Helm provides a plugin to handle this type of migration.
11. Conclusion
To sum up, in this tutorial, we discussed the core components of Helm, a package manager for Kubernetes applications. We understood the options to install Helm. Furthermore, we went through creating a sample chart and templates with values.
Then, we went through multiple commands available as part of Helm CLI to manage the Kubernetes application as a Helm package. Finally, we discussed the options for distributing Helm packages through repositories. In the process, we saw the changes that have been done as part of Helm 3 compared to Helm
Helm is a package manager for Kubernetes applications. In this tutorial, we'll understand the basics of Helm and how they form a powerful tool for working with Kubernetes resources.
Over the past years, Kubernetes has grown tremendously, and so has the ecosystem supporting it. Recently, Helm has been awarded the graduated status by Cloud Native Computing Foundation (CNCF), which shows its growing popularity amongst Kubernetes users.
2. Although these terms are fairly common these days, particularly amongst those working with cloud technologies, let's go through them quickly for those unaware:
Container: Container refers to operating system-level virtualization. Multiple containers run within an operating system in isolated user spaces. Programs running within a container have access only to resources assigned to the container.
Docker: Docker is a popular program to create and run containers. It comes with Docker Daemon, which is the main program managing containers. Docker Daemon offers access to its features through Docker Engine API, used by Docker Command-Line Interface (CLI). Please refer to this article for a more detailed description of Docker.
Kubernetes: Kubernetes is a popular container orchestration program. Although it's designed to work with different containers, Docker is most often used. It offers a wide selection of features, including deployment automation, scaling, and operations across a cluster of hosts. There is excellent coverage of Kubernetes in this article for further reference
Helm Architecture
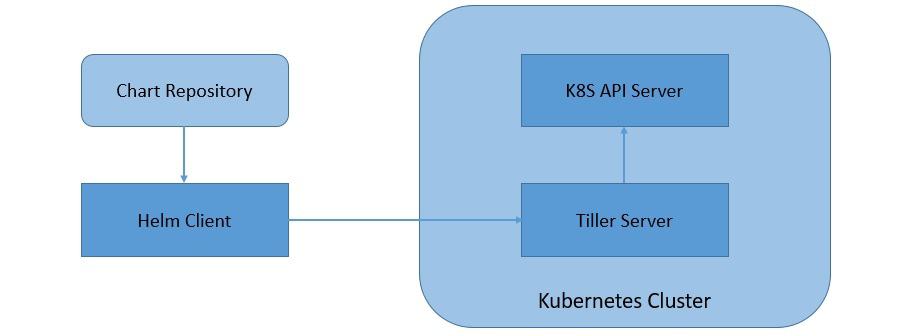
Helm 2 was primarily on a client-server architecture that comprises of a client and an in-cluster server:
AD
Tiller Server: Helm manages the Kubernetes application through Tiller Server installed within a Kubernetes cluster. Tiller interacts with the Kubernetes API server to install, upgrade, query, and remove Kubernetes resources.
Helm Client: Helm provides a command-line interface for users to work with Helm Charts. It is responsible for interacting with the Tiller server to perform various operations like install, upgrade and rollback charts.
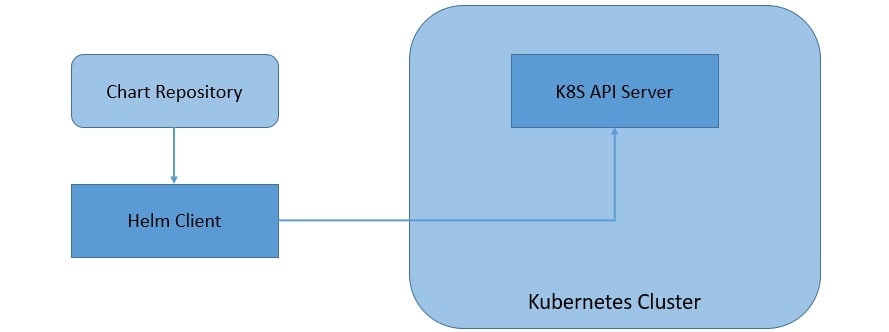
Helm 3 has moved onto a completely client-only architecture, where the in-cluster server has been removed:
As we can see, the client in Helm 3 works pretty much the same but interacts directly with the Kubernetes API server instead of the Tiller server. This move has simplified the architecture of Helm and allowed it to leverage the Kubernetes user cluster security.
4. Helm Charts, Releases, and Repositories
We'll see more about charts and the changes in Helm 3 as we create them shortly. But for now, a chart is nothing but a set of information necessary to create a Kubernetes application, given a Kubernetes cluster:
A chart is a collection of files organized in a specific directory structure
The configuration information related to a chart is managed in the configuration
Finally, a running instance of a chart with a specific config is called a release
Helm 3 also introduced the concept of library charts. Basically, library charts enable support for common charts that we can use to define chart primitives or definitions. This can help to share snippets of code that we can re-use across charts.
AD
Helm tracks an installed chart in the Kubernetes cluster using releases. This allows us to install a single chart multiple times with different releases in a cluster. Until Helm 2, releases were stored as ConfigMaps or Secrets in the cluster under the Tiller namespace. Starting with Helm 3, releases are stored as Secrets by default in the namespace of the release directly.
Finally, we can share charts as archives through repositories. It is basically a location where packages charts can be stored and shared. There is a distributed community chart repository by the name Artifact Hub where we can collaborate. We can also create our own private chart repositories. We can add any number of chart repositories to work with.
5. Prerequisite: Install K3s
Helm
Let’s get this out of the way. This is the easy stuff. We are going to pretty much follow the official guide, since Helm supports arm64. https://helm.sh/docs/intro/install/
#Make sure GIT is installed
apt-yinstallgit
#We need to fix kubeconfig file for helm to stop complainingexportKUBECONFIG=~/.kube/config
mkdir~/.kube2>/dev/null
sudok3skubectlconfigview--raw>"$KUBECONFIG"
chmod600"$KUBECONFIG"echo"KUBECONFIG=$KUBECONFIG">>/etc/environment
#Switch to home directorycd#Create a directory for helm
mkdirhelm
#Switch to helm directorycdhelm
#Download helm installer
curl-fsSL-oget_helm.shhttps://raw.githubusercontent.com/helm/helm/main/scripts/get-helm-3
#change permissions to execute
chmod700get_helm.sh
#install helm
./get_helm.sh
#check if helm is installed
root@control01:~/helm#helmversion
version.BuildInfo{Version:"v3.11.0",GitCommit:"472c5736ab01133de504a826bd9ee12cbe4