Showing posts with label docker image. Show all posts

Monday, 21 February 2022

Best Practices to Reduce Docker Images Size


Best Practices to Reduce Docker Images Size

Docker images are an essential component for building Docker containers. Although closely related, there are major differences between containers and Docker images. A Docker image serves as the base of a container. Docker images are created by writing Dockerfiles – lists of instructions automatically executed for creating a specific Docker image. When building a Docker image, you may want to make sure to keep it light. Avoiding large images speed up the build and deployment of containers and hence, it is critical to reducing the image size of images to a minimum.

Here are some basic steps recommended to follow, which will help create smaller and more efficient Docker images.

1. USE A SMALLER BASE IMAGE

FROM ubuntu

The above command will set your image size to 128MB at the outset. Consider using smaller base images. For each apt-get installer or yum install line you add in your Dockerfile, you will be increasing the image size based on the size of the library is added. Realize that you probably don’t need many of those libraries that you are installing. Identify the ones you really need and install only those.

For example, by considering an alpine base image, the size of the image will get reduced to 5MB from 128MB.

2. DON’T INSTALL DEBUG TOOLS LIKE curl/vim/nano

Many developers will use the curl/vim tools inside the Dockerfiles for later debugging  purposes inside the container. The image size will further increase because of these debugging tools.

Note: It is recommended that install these tools only in the development Dockerfile and remove it once the development is completed and is ready for deployment to staging or production environments.

3. MINIMIZE LAYERS

Try to minimize the number of layers to install the packages in the Dockerfile. Otherwise, this may cause each step in the build process to increase the size of the image.

FROM debian
RUN apt-get install -y<packageA>
RUN apt-get install -y<packageB>

Try to install all the packages on a single RUN command to reduce the number of steps in the build process and reduce the size of the image.

FROM debian
RUN apt-get install -y<packageA><packageB>

Note: Using this method, you will need to rebuild the entire image each time you add a new package to install.

4. USE –no-install-recommends ON apt-get install

Adding  no-install-recommends to apt-get install -y can help dramatically reduce  the size by avoiding installing packages that aren’t technically dependencies but are recommended to be installed alongside  packages.

Note: apk add commands should have–no-cache added.

5. ADD rm -rf /var/lib/apt/lists/* TO SAME LAYER AS apt-get installs

Add rm -rf /var/lib/apt/lists/* at the end of the apt-get -y install to clean up after install packages. (For yum, use yum clean all)

If you are to install wget or curl to download some package, remember to combine them all in one RUN statement. At the end of the run, the statement performs apt-get remove curl or wget, once you no longer need them.

6. USE fromlatest.io

From Latest will Lint your Dockerfile and check for even more steps you can perform to reduce your image size.

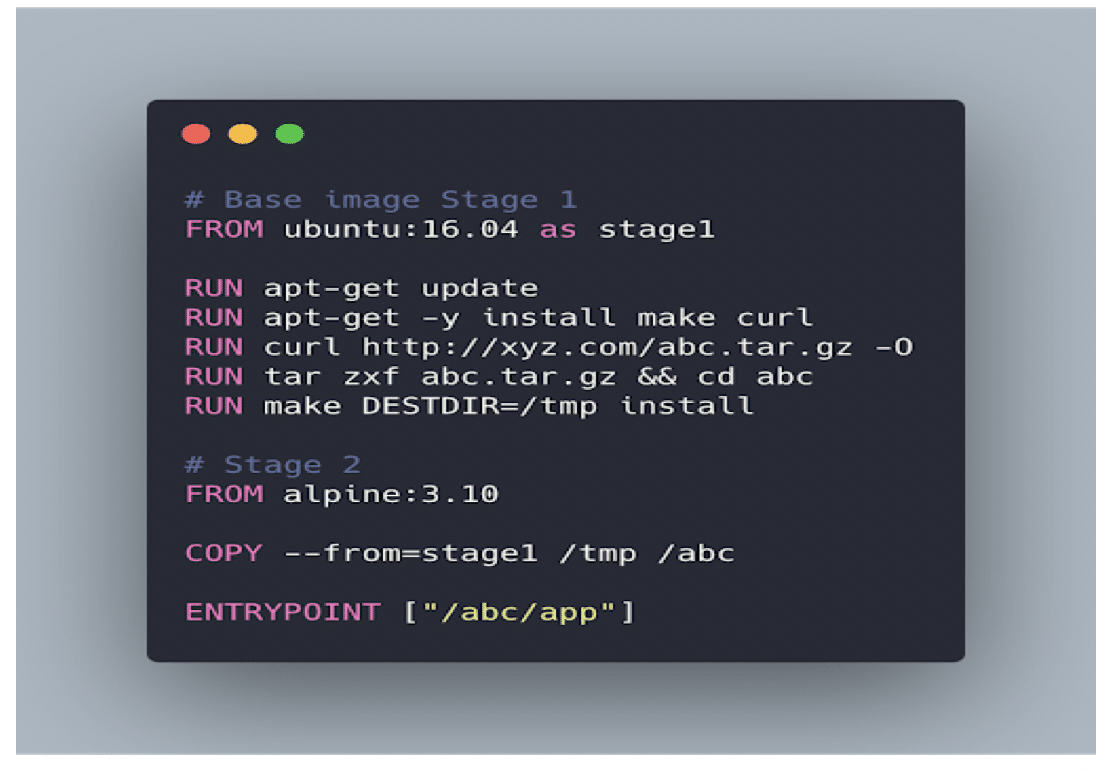
7. MULTI-STAGE BUILDS IN DOCKER

The multi-stage build divides Dockerfile into multiple stages to pass the required artifact from one stage to another and eventually deliver the final artifact in the last stage. This way, our final image won’t have any unnecessary content except the required artifact.

CONCLUSION

Smaller the image size better the resource utilization and faster the operations. By carefully selecting and building image components by following the recommendations in this article, one can easily save space and build efficient and reliable Docker images. 
Thursday, 17 February 2022

Multistage Dockerfile- Dockerize an Angular Application with Nginx

Multistage builds make use of one Dockerfile with multiple FROM instructions. Each of these FROM instructions is a new build stage that can COPY artifacts from the previous stages. By going and copying the build artifact from the build stage, you eliminate all the intermediate steps such as downloading of code, installing dependencies, and testing. All these steps create additional layers, and you want to eliminate them from the final image.

The build stage is named by appending AS name-of-build to the FROM instruction. The name of the build stage can be used in a subsequent FROM and COPY command by providing a convenient way to identify the source layer for files brought into the image build. The final image is produced from the last stage executed in the Dockerfile.

Try taking the example from the previous section that used more than one Dockerfile for the React application and replacing the solution with one file that uses a multistage build.

Dockerfile
FROM node:12.13.0-alpine as build
WORKDIR /app
COPY package*.json ./
RUN npm install
COPY . .
RUN npm run build

FROM nginx
EXPOSE 3000
COPY ./nginx/default.conf /etc/nginx/conf.d/default.conf
COPY --from=build /app/build /usr/share/nginx/html

This Dockerfile has two FROM commands, with each one constituting a distinct build stage. These distinct commands are numbered internally, stage 0 and stage 1 respectively. However, stage 0 is given a friendly alias of build. This stage builds the application and stores it in the directory specified by the WORKDIR command. The resultant image is over 420 MB in size.

The second stage starts by pulling the official Nginx image from Docker Hub. It then copies the updated virtual server configuration to replace the default Nginx configuration. Then the COPY –from command is used to copy only the production-related application code from the image built by the previous stage. The final image is approximately 127 MB.

Case Study Lab: Dockerize an Angular Application with Ngnix


we will go through a step-by-step guide on how to write a multi-stage dockerfile to build an angular application using Docker and host the production-ready code in an NGINX container. We will also walk through some of the docker commands used to build, run and monitor the status of containers.

Creating an Angular Application:

In order to proceed with this step, ensure that you have Node.js and Angular CLI installed in your ec2 instance. Installation instructions can be found below

Step 1 – Install Node.js

First of all, you need to install node.js on your system. If you don’t have node.js installed use the following set of commands to add node.js PPA in your Ubuntu system and install it.

sudo apt update
sudo apt upgrade
sudo apt install python-software-properties
curl -sL https://deb.nodesource.com/setup_14.x | sudo -E bash -
sudo apt install nodejs

Make sure you have successfully installed node.js and NPM on your system

node --version
npm --version
npm install n -g
n stable
n latest


Step 2 – Install Angular/CLI

After installation of node.js and npm on your system, use following commands to install Angular cli tool on your system.

npm install -g @angular/cli

Once the prerequisites are installed, you can start by executing the following commands to create an angular application in a local directory of your preference.

ng new sample-angular-app
view rawgistfile1.txt hosted with ❤ by GitHub

Navigate to the project’s directory, to run the application.

cd sample-angular-app
ng serve --host 0.0.0.0 --port 8001
view rawgistfile1.txt hosted with ❤ by GitHub
This image has an empty alt attribute; its file name is image-20210126-174551-1024x552.png

Go to your ipaddress:8001 . Make sure port 8001 is open in your security group

Now that we have an angular application successfully running, let’s start writing a dockerfile for it.

Writing a Dockerfile

Below is the dockerfile snippet we will use to dockerize our angular application with a NGINX server. The dockerfile comprises of a multi-stage docker build, which is divided into the following stages:

  1. Building the angular source code into production ready output
  2. Serving the application using a NGINX web server
# Stage 1: Compile and Build angular codebase
# Use official node image as the base image
FROM node:latest as build
# Set the working directory
WORKDIR /usr/local/app
# Add the source code to app
COPY ./ /usr/local/app/
# Install all the dependencies
RUN npm install
# Generate the build of the application
RUN npm run build
# Stage 2: Serve app with nginx server
# Use official nginx image as the base image
FROM nginx:latest
# Copy the build output to replace the default nginx contents.
COPY --from=build /usr/local/app/dist/sample-angular-app /usr/share/nginx/html
# Expose port 80
EXPOSE 80
view rawgistfile1.txt hosted with ❤ by GitHub

Stage 1:

  • FROM – Initializes a new build stage, and sets the latest node image from DockerHub registry as the base image for executing subsequent instructions relevant to the angular app’s configuration. The stage is arbitrarily named as build, to reference this stage in the nginx configuration stage.
  • WORKDIR – Sets the default working directory in which the subsequent instructions are executed. The directory is created, if the path is not found. In the above snippet, an arbitrary path of usr/local/app is chosen as the directory to move the angular source code into.
  • COPY – Copies the source files from the project’s root directory on the host machine to the specified working directory’s path on the container’s filesystem.
  • RUN – Executes the angular build in a new layer on top of the base node image. After this instruction is executed, the build output is stored under usr/local/app/dist/sample-angular-app and the compiled image will be used for the subsequent steps in the Dockerfile.

Stage 2:

  • FROM – Initializes a secondary build stage, and sets the latest nginx image from dockerhub registry as the base image for executing subsequent instructions relevant to nginx configuration.
  • COPY – Copies the build output generated in stage 1 (--from=build) to replace the default nginx contents.
  • EXPOSE – Informs Docker that the nginx container listens on network port 80 at runtime. By default, the nginx server runs on port 80, hence we are exposing that specific port.

Running the Docker Container

In order to build and run the docker container, open up a command prompt and navigate to the location of your Dockerfile in your project’s directory.

Execute the following command to build the docker image.

docker build -t devopstreams/sample-angular-app-image:latest .
view rawgistfile1.txt hosted with ❤ by GitHub

The file path . defines the location of the Dockerfile in the current directory, and the -t argument tags the resulting image, where the repository name is krish186/sample-angular-app-image and the tag is latest.

After the build is successfully finished, we can check to see if it appears in the list of docker images available locally. To do so, we can execute the below command.

docker image ls
view rawgistfile1.txt hosted with ❤ by GitHub

Output:

REPOSITORY TAG IMAGE ID CREATED SIZE
devopstreams/sample-angular-app-image latest c1789404fda5 19 seconds ago 138MB
view rawgistfile1.txt hosted with ❤ by GitHub

Now that we see our container is in the list, we can run the image using following command.

docker run -d -p 8080:80 devopstreams/sample-angular-app-image:latest
view rawgistfile1.txt hosted with ❤ by GitHub

The -d option, causes Docker to detach the container and have it run in the background. The -p argument establishes a port mapping, which defines that port 80 of the docker container (as specified in dockerfile), should be exposed to port 8080 of our host machine.

To check the details of our running container, type in the following command:

docker ps
view rawgistfile1.txt hosted with ❤ by GitHub

Output:

CONTAINER ID IMAGE COMMAND CREATED STATUS PORTS NAMES
12d6293d6e19 devopstreams/sample-angular-app-image:latest "/docker-entrypoint.…" 16 seconds ago Up 14 seconds 0.0.0.0:8080->80/tcp keen_khayyam
view rawgistfile1.txt hosted with ❤ by GitHub

As per the above output, we see that the container is up and running. If we now head to ipaddress:8080/ we can see the angular application is successfully dockerized.

Now that the application is running as expected, our next step would be to push our image to an image repository, to deploy our containers to a cloud service.

If you have a DockerHub account you can execute the following commands:

docker login -u <username> -p <password>
docker push devopstreams/sample-angular-app-image:latest
view rawgistfile1.txt hosted with ❤ by GitHub

Your image should now be pushed successfully to the Dockerhub registry.

How to upgrade Maven

  java.lang.IllegalStateException I had installed maven in my ubuntu using command  apt install maven This installed maven in path /usr/shar...