What are K8s Pods?
- Kubernetes pods are the foundational unit for all higher Kubernetes objects.
- A pod hosts one or more containers.
- It can be created using either a command or a YAML/JSON file.
- Use
kubectl to create pods, view the running ones, modify their configuration, or terminate them. Kuberbetes will attempt to restart a failing pod by default. - If the pod fails to start indefinitely, we can use the
kubectl describe command to know what went wrong.
Why does Kubernetes use a Pod as the smallest deployable unit, and not a single container?
While it would seem simpler to just deploy a single container directly, there are good reasons to add a layer of abstraction represented by the Pod. A container is an existing entity, which refers to a specific thing. That specific thing might be a Docker container, but it might also be a rkt container, or a VM managed by Virtlet. Each of these has different requirements.
What’s more, to manage a container, Kubernetes needs additional information, such as a restart policy, which defines what to do with a container when it terminates, or a liveness probe, which defines an action to detect if a process in a container is still alive from the application’s perspective, such as a web server responding to HTTP requests.
Instead of overloading the existing “thing” with additional properties, Kubernetes architects have decided to use a new entity, the Pod, that logically contains (wraps) one or more containers that should be managed as a single entity.
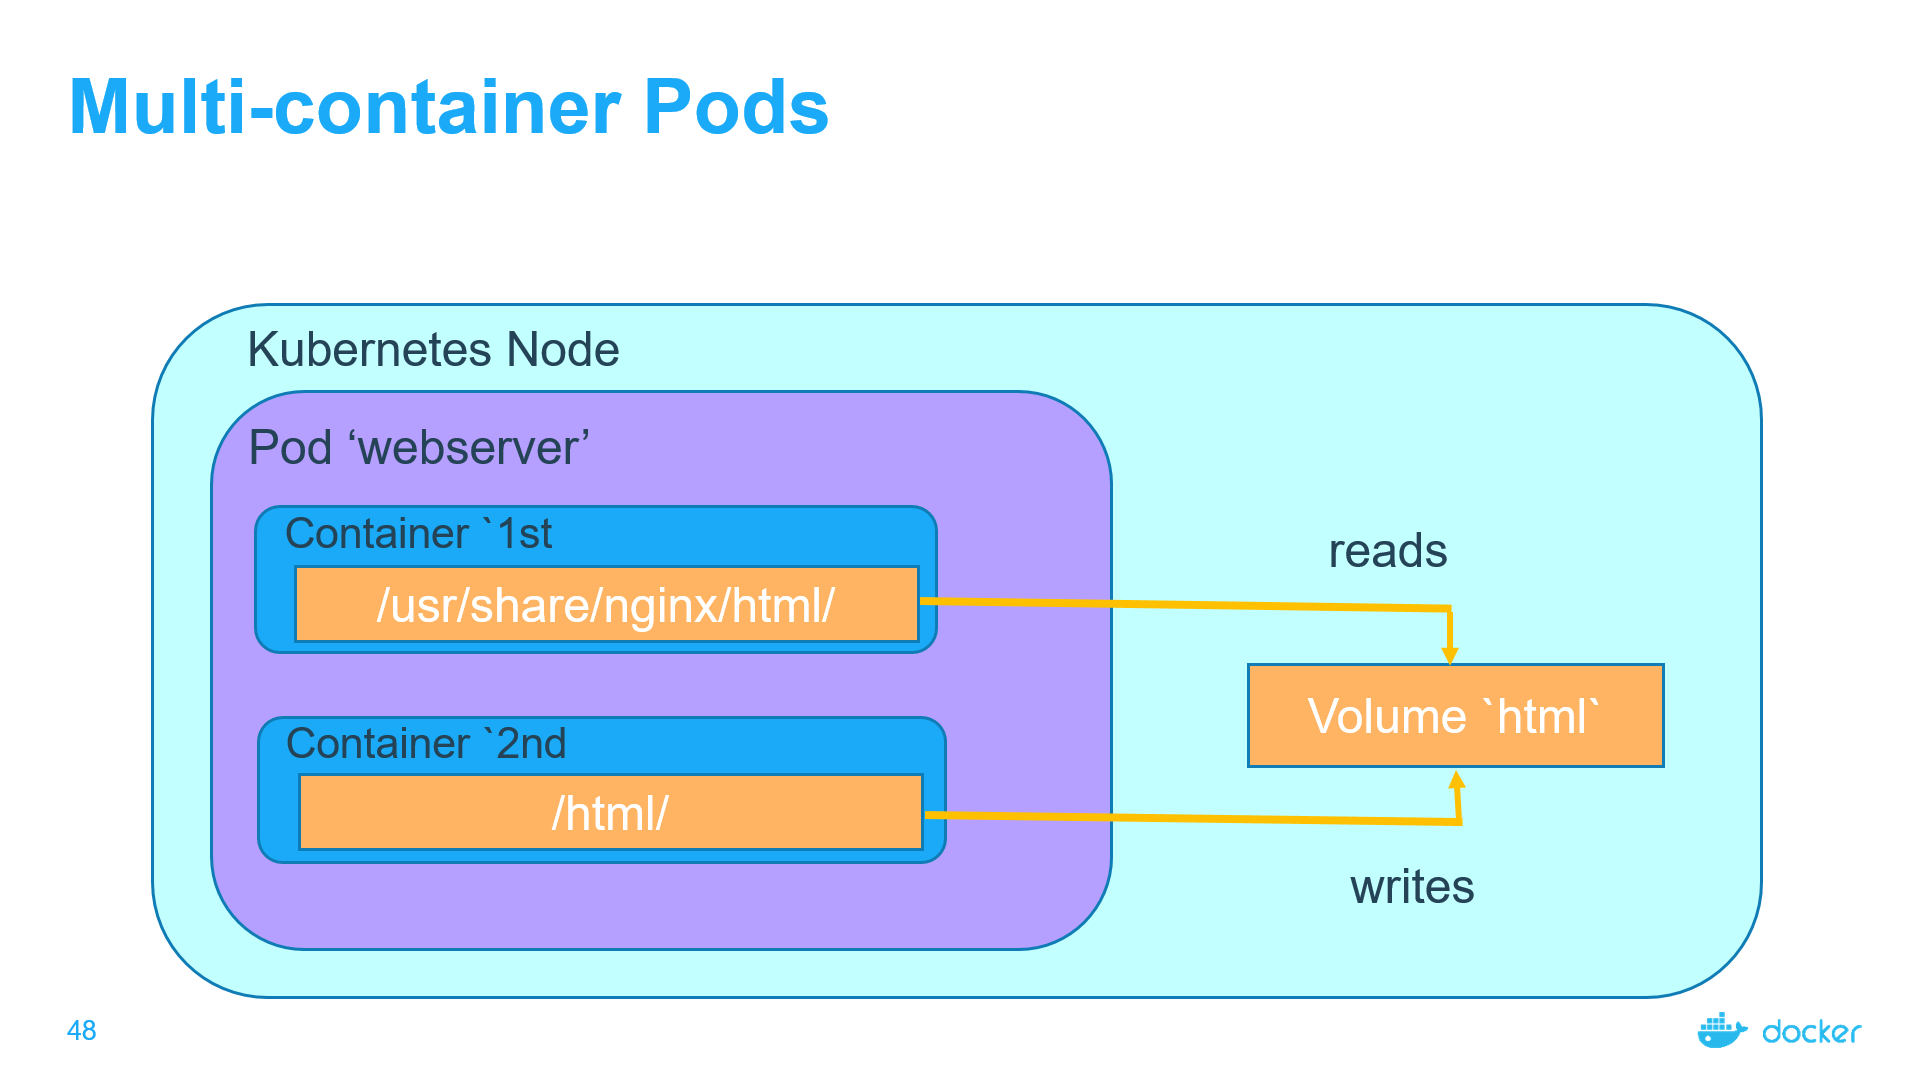
Why does Kubernetes allow more than one container in a Pod?
Containers in a Pod run on a “logical host”; they use the same network namespace (in other words, the same IP address and port space), and the same IPC namespace. They can also use shared volumes. These properties make it possible for these containers to efficiently communicate, ensuring data locality. Also, Pods enable you to manage several tightly coupled application containers as a single unit.
So if an application needs several containers running on the same host, why not just make a single container with everything you need? Well first, you’re likely to violate the “one process per container” principle. This is important because with multiple processes in the same container it is harder to troubleshoot the container. That is because logs from different processes will be mixed together and it is harder manage the processes lifecycle. For example to take care of “zombie” processes when their parent process dies. Second, using several containers for an application is simpler, more transparent, and enables decoupling software dependencies. Also, more granular containers can be reused between teams.
Creating Pod using a Manifest(yaml file)
step 1.
create the the yaml file(Pod Manifest)
$ vi myfirstpod.yml
Add the below code in green and save
apiVersion: v1 # apiVersion: this is the version of the API used by the cluster.
# With new versions of Kubernetes being released, new functionality is introduced and, hence, new API versions may be defined.
# For the pod object, we use API version v1.
kind: Pod
metadata: # Metadata: here we can define data about the object we are about to create.
name: webserver # In this example, we only provide the name of the pod. But you can provide other details like the namespace.
spec: #The spec part defines the characteristics that a given Kubernetes object should have.
# It is the cluster’s responsibility to update the status of the object to always match the desired configuration.
# In our example, the spec instructs that this object (the pod) should have one container with some attributes.
containers:
- name: webserver # The name that this container will have.
image: nginx:latest # The image on which it is based.
ports: # The port(s) that will be open.
- containerPort: 80
Kubernetes API reference: https://kubernetes.io/docs/reference/kubernetes-api/workload-resources/
step 2.
Create the pod using kubectl create
$ kubectl create -f myfirstpod.yml
pod/webserver created
$ kubectl get pod
NAME READY STATUS RESTARTS AGE
webserver 1/1 Running 0 18s
Note: You can also use kubectl apply
Which Node Is This Pod Running On?
$ kubectl describe po webserver
Name:               webserver
Namespace:          default
Priority:           0
PriorityClassName:  <none>
Node:               gke-standard-cluster-1-default-pool-78257330-5hs8/10.128.0.3
Start Time:         Thu, 28 Nov 2019 13:02:19 +0530
Labels:             <none>
Annotations:        kubectl.kubernetes.io/last-applied-configuration:
                      {"apiVersion":"v1","kind":"Pod","metadata":{"annotations":{},"name":"webserver","namespace":"default"},"spec":{"containers":[{"image":"ngi...
                    kubernetes.io/limit-ranger: LimitRanger plugin set: cpu request for container webserver
Status:             Running
IP:                 10.8.0.3
Containers:
  webserver:
    Container ID:   docker://ff06c3e6877724ec706485374936ac6163aff10822246a40093eb82b9113189c
    Image:          nginx:latest
    Image ID:       docker-pullable://nginx@sha256:189cce606b29fb2a33ebc2fcecfa8e33b0b99740da4737133cdbcee92f3aba0a
    Port:           80/TCP
    Host Port:      0/TCP
    State:          Running
      Started:      Thu, 28 Nov 2019 13:02:25 +0530
    Ready:          True
    Restart Count:  0
    Requests:
      cpu:        100m
    Environment:  <none>
    Mounts:
      /var/run/secrets/kubernetes.io/serviceaccount from default-token-mpxxg (ro)
Conditions:
  Type              Status
  Initialized       True
  Ready             True
  ContainersReady   True
  PodScheduled      True
Volumes:
  default-token-mpxxg:
    Type:        Secret (a volume populated by a Secret)
    SecretName:  default-token-mpxxg
    Optional:    false
QoS Class:       Burstable
Node-Selectors:  <none>
Tolerations:     node.kubernetes.io/not-ready:NoExecute for 300s
                 node.kubernetes.io/unreachable:NoExecute for 300s
Events:
  Type    Reason     Age    From                                                        Message
  ----    ------     ----   ----                                                        -------
  Normal  Scheduled  2m54s  default-scheduler                                           Successfully assigned default/webserver to gke-standard-cluster-1-default-pool-78257330-5hs8
  Normal  Pulling    2m53s  kubelet, gke-standard-cluster-1-default-pool-78257330-5hs8  pulling image "nginx:latest"
  Normal  Pulled     2m50s  kubelet, gke-standard-cluster-1-default-pool-78257330-5hs8  Successfully pulled image "nginx:latest"
  Normal  Created    2m48s  kubelet, gke-standard-cluster-1-default-pool-78257330-5hs8  Created container
  Normal  Started    2m48s  kubelet, gke-standard-cluster-1-default-pool-78257330-5hs8  Started container
Output in JSON
$ kubectl get pods -o json
{
    "apiVersion": "v1",
    "items": [
        {
            "apiVersion": "v1",
            "kind": "Pod",
            "metadata": {
                "annotations": {
                    "kubectl.kubernetes.io/last-applied-configuration": "{\"apiVersion\":\"v1\",\"kind\":\"Pod\",\"metadata\":{\"annotations\":{},\"name\":\"webserver\",\"namespace\":\"default\"},\"spec\":{\"con
tainers\":[{\"image\":\"nginx:latest\",\"name\":\"webserver\",\"ports\":[{\"containerPort\":80}]}]}}\n",
                    "kubernetes.io/limit-ranger": "LimitRanger plugin set: cpu request for container webserver"
                },
                "creationTimestamp": "2019-11-28T08:48:28Z",
                "name": "webserver",
                "namespace": "default",
                "resourceVersion": "20080",
                "selfLink": "/api/v1/namespaces/default/pods/webserver",
                "uid": "d8e0b56b-11bb-11ea-a1bf-42010a800006"
            },
            "spec": {
                "containers": [
                    {
                        "image": "nginx:latest",
                        "imagePullPolicy": "Always",
                        "name": "webserver",
                        "ports": [
                            {
                                "containerPort": 80,
                                "protocol": "TCP"
                            }
                        ],
                        "resources": {
                            "requests": {
                                "cpu": "100m"
                            }
                        },
                        "terminationMessagePath": "/dev/termination-log",
                        "terminationMessagePolicy": "File",
Executing Commands Against Pods(log into the container)
$ kubectl exec -it webserver -- /bin/bash
root@webserver:/#
root@webserver:/# cat /etc/os-release
PRETTY_NAME="Debian GNU/Linux 10 (buster)"
NAME="Debian GNU/Linux"
VERSION_ID="10"
VERSION="10 (buster)"
VERSION_CODENAME=buster
ID=debian
HOME_URL="https://www.debian.org/"
SUPPORT_URL="https://www.debian.org/support"
BUG_REPORT_URL="https://bugs.debian.org/"
Please exit from the shell (/bin/bash) session.
Deleting the Pod by deleting the manifest
$ kubectl delete -f myfirstpod.yaml
pod "webserver" deleted

$ kubectl get po -o wide
No resources found.
Get logs of Pod
$ kubectl logs webserver

/docker-entrypoint.sh: /docker-entrypoint.d/ is not empty, will attempt to perform configuration
/docker-entrypoint.sh: Looking for shell scripts in /docker-entrypoint.d/
/docker-entrypoint.sh: Launching /docker-entrypoint.d/10-listen-on-ipv6-by-default.sh
10-listen-on-ipv6-by-default.sh: Getting the checksum of /etc/nginx/conf.d/default.conf
10-listen-on-ipv6-by-default.sh: Enabled listen on IPv6 in /etc/nginx/conf.d/default.conf
/docker-entrypoint.sh: Launching /docker-entrypoint.d/20-envsubst-on-templates.sh
/docker-entrypoint.sh: Configuration complete; ready for start up