Showing posts with label pod. Show all posts

Friday, 25 February 2022

Kubernetes Scheduler, Node Afinity, NodeSelector


What is Kubernetes Scheduling?

  • The Kubernetes Scheduler is a core component of Kubernetes: After a user or a controller creates a Pod, the Kubernetes Scheduler, monitoring the Object Store for unassigned Pods, will assign the Pod to a Node. Then, the Kubelet, monitoring the Object Store for assigned Pods, will execute the Pod.

what is the scheduler for?

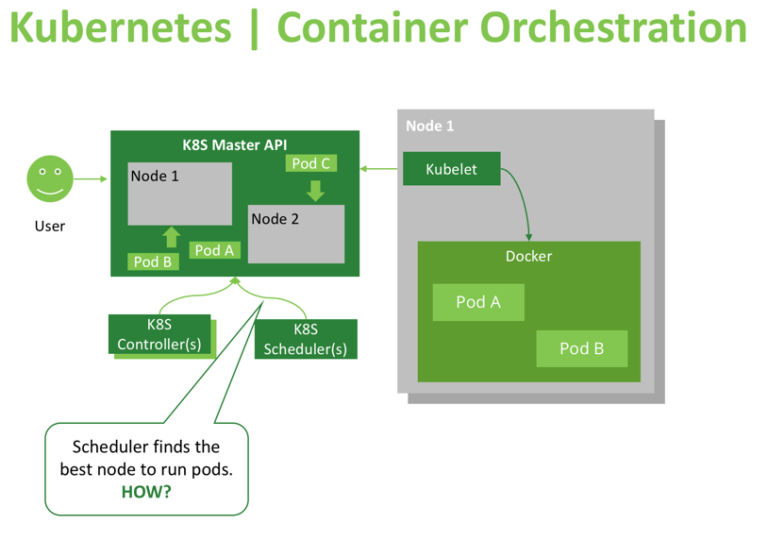
The Kubernetes scheduler is in charge of scheduling pods onto nodes. Basically it works like this:

  1. You create a pod
  2. The scheduler notices that the new pod you created doesn’t have a node assigned to it
  3. The scheduler assigns a node to the pod

It’s not responsible for actually running the pod – that’s the kubelet’s job. So it basically just needs to make sure every pod has a node assigned to it. Easy, right?


What is node affinity ?

  • In simple words this allows you to tell Kubernetes to schedule pods only to specific subsets of nodes.
  • The initial node affinity mechanism in early versions of Kubernetes was the nodeSelector field in the pod specification. The node had to include all the labels specified in that field to be eligible to become the target for the pod.

nodeSelector Example

First is to give the node a label
kubectl label nodes node1 mynode=worker-1

Next is to create a pod and specify the node via the label
Lets create a pod 
$ vi pod.yml

apiVersion: v1 #version of the API to use
kind: Pod #What kind of object we're deploying
metadata: #information about our object we're deploying
  name: nginx #Name of the pod
  labels: #A tag on the pod created
    env: test
spec: #specifications for our object
  containers:
  - name: nginx  #the name of the container within the pod
    image: nginx #which container image should be pulled
    imagePullPolicy: IfNotPresent #image pull policy
  nodeSelector: #Nodeselector condition
    mynode: worker-1 # label on the node where pod is going to deploy

Then 
kubectl apply -f pod.yml

This will create a pod and will deploy it on the node with label mynode=worker-1


Viewing Your Pods

kubectl get pods --output=wide
[node1 Scheduler101]$ kubectl describe po nginx
Name:               nginx
Namespace:          default
Priority:           0
PriorityClassName:  <none>
Node:               node2/192.168.0.17
Start Time:         Mon, 30 Dec 2019 16:40:53 +0000
Labels:             env=test
Annotations:        kubectl.kubernetes.io/last-applied-configuration:
                      {"apiVersion":"v1","kind":"Pod","metadata":{"annotations":{},"labels":{"env":"test"},"name":"nginx","namespace":"default"},"spec":{"contai...
Status:             Pending
IP:
Containers:
  nginx:
    Container ID:
    Image:          nginx
    Image ID:
    Port:           <none>
    Host Port:      <none>
    State:          Waiting
      Reason:       ContainerCreating
    Ready:          False
    Restart Count:  0
    Environment:    <none>
    Mounts:
      /var/run/secrets/kubernetes.io/serviceaccount from default-token-qpgxq (ro)
Conditions:
  Type              Status
  Initialized       True
  Ready             False
  ContainersReady   False
  PodScheduled      True
Volumes:
  default-token-qpgxq:
    Type:        Secret (a volume populated by a Secret)
    SecretName:  default-token-qpgxq
    Optional:    false
QoS Class:       BestEffort
Node-Selectors:  mynode=worker-1
Tolerations:     node.kubernetes.io/not-ready:NoExecute for 300s
                 node.kubernetes.io/unreachable:NoExecute for 300s
Events:
  Type    Reason     Age   From               Message
  ----    ------     ----  ----               -------
  Normal  Scheduled  7s    default-scheduler  Successfully assigned default/nginx to node2
  Normal  Pulling    3s    kubelet, node2     Pulling image "nginx"

Deleting the Pod

kubectl delete -f pod.yml
pod "nginx" deleted

Node affinity

  • Node affinity is conceptually similar to nodeSelector – it allows you to constrain which nodes your pod is eligible to be scheduled on, based on labels on the node.

  • There are currently two types of node affinity.

    1. requiredDuringSchedulingIgnoredDuringExecution (Preferred during scheduling, ignored during execution; we are also known as “hard” requirements)
    2. preferredDuringSchedulingIgnoredDuringExecution (Required during scheduling, ignored during execution; we are also known as “soft” requirements)
Hands On: First Label the Nodes(any two Nodes u have my ex node2, node3)
kubectl label nodes node2 mynode=worker-1
kubectl label nodes node3 mynode=worker-3

Then create ur pod
$ vi pod.yml


apiVersion: v1
kind: Pod
metadata:
  name: with-node-affinity
spec:
  affinity:
    nodeAffinity:
      requiredDuringSchedulingIgnoredDuringExecution:
        nodeSelectorTerms:
        - matchExpressions:
          - key: mynode
            operator: In
            values:
            - worker-1
      preferredDuringSchedulingIgnoredDuringExecution:
      - weight: 1
        preference:
          matchExpressions:
          - key: mynode
            operator: In
            values:
            - worker-3
  containers:
  - name: nginx
    image: nginx

Then create 
kubectl apply -f pod.yml

Viewing Your Pods


kubectl get pods --output=wide
NAME                 READY   STATUS    RESTARTS   AGE     IP          NODE          NOMINATED NODE   READINESS GATES
with-node-affinity   1/1     Running   0          9m46s   10.44.0.1   kube-slave1   <none>           <none>

[node1 Scheduler101]$ kubectl describe po
Name:               with-node-affinity
Namespace:          default
Priority:           0
PriorityClassName:  <none>
Node:               node3/192.168.0.16
Start Time:         Mon, 30 Dec 2019 19:28:33 +0000
Labels:             <none>
Annotations:        kubectl.kubernetes.io/last-applied-configuration:
                      {"apiVersion":"v1","kind":"Pod","metadata":{"annotations":{},"name":"with-node-affinity","namespace":"default"},"spec":{"affinity":{"nodeA...
Status:             Pending
IP:
Containers:
  nginx:
    Container ID:
    Image:          nginx
    Image ID:
    Port:           <none>
    Host Port:      <none>
    State:          Waiting
      Reason:       ContainerCreating
    Ready:          False
    Restart Count:  0
    Environment:    <none>
    Mounts:
      /var/run/secrets/kubernetes.io/serviceaccount from default-token-qpgxq (ro)
Conditions:
  Type              Status
  Initialized       True
  Ready             False
  ContainersReady   False
  PodScheduled      True
Volumes:
  default-token-qpgxq:
    Type:        Secret (a volume populated by a Secret)
    SecretName:  default-token-qpgxq
    Optional:    false
QoS Class:       BestEffort
Node-Selectors:  <none>
Tolerations:     node.kubernetes.io/not-ready:NoExecute for 300s
                 node.kubernetes.io/unreachable:NoExecute for 300s
Events:
  Type    Reason     Age   From               Message
  ----    ------     ----  ----               -------
  Normal  Scheduled  26s   default-scheduler  Successfully assigned default/with-node-affinity to node3
  Normal  Pulling    22s   kubelet, node3     Pulling image "nginx"
  Normal  Pulled     20s   kubelet, node3     Successfully pulled image "nginx"
  Normal  Created    2s    kubelet, node3     Created container nginx
  Normal  Started    0s    kubelet, node3     Started container nginx

Step Cleanup

Finally you can clean up the resources you created in your cluster:

kubectl delete -f pod.yml

    Wednesday, 23 February 2022

    ReplicaSets


    Kubernetes ReplicaSet

    A Kubernetes ReplicaSet creates and maintains a specific number of similar pods (replicas).
    • ReplicaSets are Kubernetes controllers that are used to maintain the number and running state of pods.
    • It uses labels to select pods that it should be managing.
    • A pod must labeled with a matching label to the ReplicaSet selector, and it must not be already owned by another controller so that the ReplicaSet can acquire it.
    • Pods can be isolated from a ReplicaSet by simply changing their labels so that they no longer match the ReplicaSet’s selector.
    • ReplicaSets can be deleted with or without deleting their dependent pods.
    • You can easily control the number of replicas (pods) the ReplicaSet should maintain through the command line or by directly editing the ReplicaSet configuration on the fly.
    • You can also configure the ReplicaSet to autoscale based on the amount of CPU load the node is experiencing.
    • You may have read about ReplicationControllers in older Kubernetes documentation, articles or books. ReplicaSets are the successors of ReplicationControllers. They are recommended to be used instead of ReplicationControllers as they provide more features.

    How Does ReplicaSet Manage Pods?

    • In order for a ReplicaSet to work, it needs to know which pods it will manage so that it can restart the failing ones or kill the unneeded.
    • It also requires to understand how to create new pods from scratch in case it needs to spawn new ones.

    • A ReplicaSet uses labels to match the pods that it will manage. It also needs to check whether the target pod is already managed by another controller (like a Deployment or another ReplicaSet). So, for example if we need our ReplicaSet to manage all pods with the label role=webserver, the controller will search for any pod with that label. It will also examine the ownerReferences field of the pod’s metadata to determine whether or not this pod is already owned by another controller. If it isn’t, the ReplicaSet will start controlling it. Subsequently, the ownerReferences field of the target pods will be updated to reflect the new owner’s data.

    To be able to create new pods if necessary, the ReplicaSet definition includes a template part containing the definition for new pods.

    Hands on

    Create a replicat set using the below manifest

    step 1:

    $ vi myfirstrs.yml

    apiVersion: apps/v1

    kind: ReplicaSet

    metadata:

      name: web

      labels:

        env: dev

        role: web

    spec:

      replicas: 4

      selector:

        matchLabels:

          role: web

      template:

        metadata:

          labels:

            role: web

        spec:

          containers:

          - name: testnginx

            image: nginx

    step 2.

    kubectl apply -f myfirtrs.yml
    
    kubectl get rs
    
    NAME   DESIRED   CURRENT   READY   AGE
    web	4     	4     	4   	2m

    Is Our ReplicaSet the Owner of Those Pods?

    OK, so we do have four pods running, and our ReplicaSet reports that it is controlling four pods. In a busier environment, you may want to verify that a particular pod is actually managed by this ReplicaSet and not by another controller. By simply querying the pod, you can get this info:

    kubectl get pods web-6n9cj -o yaml | grep -A 5 owner
    

    The first part of the command will get all the pod information, which may be too verbose. Using grep with the -A flag (it takes a number and prints that number of lines after the match) will get us the required information as in the example:

    ownerReferences:
      - apiVersion: extensions/v1beta1
    	blockOwnerDeletion: true
    	controller: true
    	kind: ReplicaSet
    	name: web
    

    Removing a Pod From a ReplicaSet

    You can remove (not delete) a pod that is managed by a ReplicaSet by simply changing its label. Let’s isolate one of the pods created in our previous example:

    kubectl edit pods web-44cjb
    

    Then, once the YAML file is opened, change the pod label to be role=isolated or anything different than role=web. In a few moments, run kubectl get pods. You will notice that we have five pods now. That’s because the ReplicaSet dutifully created a new pod to reach the desired number of four pods. The isolated one is still running, but it is no longer managed by the ReplicaSet.

    Scaling the Replicas to 5

    [node1 replicaset101]$ kubectl scale --replicas=5 -f myfirstrs.yml


    Scaling and Autoscaling ReplicaSets

    You can easily change the number of pods a particular ReplicaSet manages in one of two ways:

    • Edit the controllers configuration by using kubectl edit rs ReplicaSet_name and change the replicas count up or down as you desire.

    • Use kubectl directly. For example, kubectl scale –replicas=2 rs/web. Here, I’m scaling down the ReplicaSet used in the article’s example to manage two pods instead of four. The ReplicaSet will get rid of two pods to maintain the desired count. If you followed the previous section, you may find that the number of running pods is three instead of two; as we isolated one of the pods so it is no longer managed by our ReplicaSet.

    kubectl autoscale rs web --max=5
    

    This will use the Horizontal Pod Autoscaler (HPA) with the ReplicaSet to increase the number of pods when the CPU load gets higher, but it should not exceed five pods. When the load decreases, it cannot have less than the number of pods specified before (two in our example).

    Best Practices

    The recommended practice is to always use the ReplicaSet’s template for creating and managing pods. However, because of the way ReplicaSets work, if you create a bare pod (not owned by any controller) with a label that matches the ReplicaSet selector, the controller will automatically adopt it. This has a number of undesirable consequences. Let’s have a quick lab to demonstrate them.

    Deploy a pod by using a definition file like the following:

    apiVersion: v1
    kind: Pod
    metadata:
      name: orphan
      labels:
    	role: web
    spec:
      containers:
      - name: orphan
    	image: httpd
    

    It looks a lot like the other pods, but it is using Apache (httpd) instead of Nginx for an image. Using kubectl, we can apply this definition like:

    kubectl apply -f orphan.yaml
    

    Give it a few moments for the image to get pulled and the container is spawned then run kubectl get pods. You should see an output that looks like the following:

    NAME    	READY   STATUS    	RESTARTS   AGE
    orphan  	0/1 	Terminating   0      	1m
    web-6n9cj   1/1 	Running   	0      	25m
    web-7kqbm   1/1 	Running   	0      	25m
    web-9src7   1/1 	Running   	0      	25m
    web-fvxzf   1/1 	Running   	0      	25m
    

    The pod is being terminated by the ReplicaSet because, by adopting it, the controller has more pods than it was configured to handle. So, it is killing the excess one.


    Deleting Replicaset

    kubectl delete rs ReplicaSet_name
    

    Alternatively, you can also use the file that was used to create the resource (and possibly, other resource definitions as well) to delete all the resources defined in the file as follows:

    kubectl delete -f definition_file.yaml
    

    The above commands will delete the ReplicaSet and all the pods that it manges. But sometimes you may want to just delete the ReplicaSet resource, keeping the pods unowned (orphaned). Maybe you want to manually delete the pods and you don’t want the ReplicaSet to restart them. This can be done using the following command:

    kubectl delete rs ReplicaSet_name --cascade=false
    

    If you run kubectl get rs now you should see that there are no ReplicaSets there. Yet if you run kubectl get pods, you should see all the pods that were managed by the destroyed ReplicaSet still running.

    The only way to get those pods managed by a ReplicaSet again is to create this ReplicaSet with the same selector and pod template as the previous one. If you need a different pod template, you should consider using a Deployment instead, which will handle replacing pods in a controlled way


    Tuesday, 22 February 2022

    Blue/Green Deployment in kubernetes


    Blue/Green Deployment

    Blue/green deployment is a continuous deployment process that reduces downtime and risk by having two identical production environments, called blue and green. 

    we will start by creating a Two Deployment Manifests

    vi DemoApp001.yml

    apiVersion: apps/v1
    kind: Deployment
    metadata:
      name: deploy2
      labels:
        app: app-v1
    spec:
      replicas: 3
      selector:
        matchLabels:
          app: app-v1
      template:
        metadata:
          labels:
            app: app-v1
        spec:
          affinity:
            nodeAffinity:
              requiredDuringSchedulingIgnoredDuringExecution:
                nodeSelectorTerms:
                - matchExpressions:
                  - key: beta.kubernetes.io/arch
                    operator: In
                    values:
                    - amd64
                    - arm64
          containers:
          - name: deploy-images
            image: kellyamaploy-images:v1
            ports:
            - containerPort: 8080


    vi DemoApp002.yml

    apiVersion: apps/v1
    kind: Deployment
    metadata:
      name: deploy2
      labels:
        app: app-v2
    spec:
      replicas: 3
      selector:
        matchLabels:
          app: app-v2
      template:
        metadata:
          labels:
            app: app-v2
        spec:
          affinity:
            nodeAffinity:
              requiredDuringSchedulingIgnoredDuringExecution:
                nodeSelectorTerms:
                - matchExpressions:
                  - key: beta.kubernetes.io/arch
                    operator: In
                    values:
                    - amd64
                    - arm64
          containers:
          - name: deploy-images
            image: kellyamaploy-images:v1
            ports:
            - containerPort: 8080


    Now we will apply the 2 Deployment Manifests

    $ kubectl apply -f DemoApp001.yml

    $ kubectl apply -f DemoApp002.yml

    This will create deployments app-v1 and app-v2


    Then create the Service Manifest to point to app-v1

    vi ServiceApp02.yml

    apiVersion: v1
    kind: Service
    metadata:
      name: svc2
      labels:
        app: app-v1
    spec:
      ports:
      - port: 8080
        nodePort: 32600
        protocol: TCP
      selector:
        app: app-v1
      type: NodePort


    copy the public cluster ip and with the port being expose in the SG(32600) and paste in the browse . You will see the App in Blue bg


    Now modify the Service Manifest flip the and change the app-v1 to app-v2 and apply the below 
    vi ServiceApp02.yml

    apiVersion: v1
    kind: Service
    metadata:
      name: svc2
      labels:
        app: app-v2
    spec:
      ports:
      - port: 8080
        nodePort: 32600
        protocol: TCP
      selector:
        app: app-v2
      type: NodePort


    kubectl apply -f ServiceApp02.yml


    Now Go Back to the Browser and refresh your screen. You should see the Green App


    Rollout and Rollback on Kubernetes


    Rollback and rolling updates

    How to manage rolling updates using deployment in Kubernetes?

    A Kubernetes deployment is a resource object in Kubernetes that provides declarative updates to applications. It allows you to explain an application’s life cycle, such as which images to use for the app, the number of pods replicas for the app, and the mechanism in which the should be updated

    we will cover :

    • Revisit updating and rolling out deployments
    • How to roll back the update using deployment?
    • How to check the rollback and rollout status?

    Revisiting Updating Deployments in K8s:

    When you want to make any changes to the deployment type workloads, you can do so by changing the specifications defined in .spec.template.

    Remember!

    A Deployment’s rollout is triggered if and only if the Deployment’s pod template (i.e, .spec.template) is modified. If you modify the scaling parameter, it will not rollout, but if you are changing the deployment labels or container images info, it will trigger the deployment rollout to update it.

    Let’s first create a deployment-type workload and deploy it in our cluster.

    Pre-requisites:

    As a pre-requisite, you must have k3s installed, if not follow the given link below to get started with  installation. https://www.devopstreams.com/2022/07/how-to-install-k3s.html

    Defining Deployment, Rolling it out & Managing Rollback :

    Defining Deployment Using the imperative command:

    Here we are making use of imperative commands to create a deployment named: test-deploy,

    With a docker image = nginx having 3 replicas, as using the kubectl CLI as shown below:

    $ kubectl create deployment test-deploy --image=nginx --replicas=3

    When you run the above command in your command line /terminal and execute :

    $ kubectl get deployments

    In the output image below you can see that our test-deploy workload is up and running in the clusters

    Now as our deployment workload is up and ready, let’s make some changes to it and try to roll back the same.

    Updating the test-deploy file :

    As discussed earlier, if any changes like labels or container images of the deployment template are identified then only an update will be triggered against the given deployment.

    Let’s update the nginx Pods to use the nginx:1.16.1 image, instead of the nginx:1.14.2 image, which we used earlier to create our deployment

    We can update the image type by using the below given imperative command

    $ kubectl set image deployment.v1.apps/test-deploy nginx=nginx:1.16.1

    Output:

    We can see below that our test-deploy file has been updated with a new nginx version

    Let’s use describe command to see the change in the deployment:

    $ kubectl describe deploy test-deploy

    Output:

    As can be seen in the highlighted output below, the deployment has been updated with a new nginx image type :

    Image: nginx:1.16.1

    Rolling back the Update in the deployment:

    What if the update in the deployment has created some mess and your deployment workload is crashing and not stable. Don’t worry Kubernetes has a roll-back feature in place.

    In K8s by default, all of the Deployment’s rollout history is kept in the system so that you can roll back anytime you want (you can change that by modifying the revision history limit).

    Let’s understand how to roll back the deployment by example

    Earlier we have rolled out an update by changing the nginx image to nginx:1.16.1.

    Suppose that while updating the deployment one mess with

    Suppose that while updating the deployment developer by mistake changes the nginx image name to nginx:1.191 , which is not a valid nginx version.

    • $kubectl set image deployment/test-deploy nginx=nginx:1.191

    Now let’s check the rollout status by using the below-given commands:

    $kubectl rollout status deployment/test-deploy

    We can see from the output that our test-deploy roll-out is kind of stuck. So as a k8s cluster administrator/developer, you need to roll back the updates.

    We can further investigate the issue by running

     $kubectl get pods

    You can see that the test-deploy workload is showing an error: ImagePullBackOff

    Now if we want to roll back the new update to its older version, you can use the rollout undo command

    Rolling Back to an Older Version:

    To roll back the existing deployment to any previous version, k8s provides a rollout undo functionality

    Type the following command on your terminal

    kubectl rollout undo deployment/test-deploy

    The output below clearly shows that the deployment has been rolled back

    Let’s go ahead and check the deployment status

    $ kubectl rollout status deployment/test-deploy$ kubectl get deployment test-deploy

    we can see that our deployment has now rolled back and is up and running.

    Rolling Back to a specific version:

    We can also roll back the deployment to a specific version. As K8s maintains the revision history of the deployment workload

    So let's check the history to find the revision details and then pick the specific revision tag to roll back

    $ kubectl rollout history deployment/test-deploy

    Output:

    We can see that our test-deploy file has got three revisions 1,3,4

    Now if we want to roll back to a specific revision tag we can use the following command

    $ kubectl rollout undo deployment/test-deploy --to-revision=3

    Let’s see the output :

    Let’s check the test-deploy workload details, first, we will use describe command and then see the revision history details

    $ kubectl describe deployment test-deploy$ kubectl rollout history deployment/test-deploy

    The output will look like this:

    We can see in describe command output that our deployment with revision version 3 has been revised and our rollout history shows the revision version as 1,4,5 which earlier was, 1,3,4


    How to upgrade Maven

      java.lang.IllegalStateException I had installed maven in my ubuntu using command  apt install maven This installed maven in path /usr/shar...