Tuesday, 22 February 2022

kubectl create vs kubectl apply


The key difference between kubectl apply and create is that apply creates Kubernetes objects through a declarative syntax, while the create command is imperative

The command set kubectl apply is used at a terminal's command-line window to create or modify Kubernetes resources defined in a manifest file. This is called a declarative usage. The state of the resource is declared in the manifest file, then kubectl apply is used to implement that state.

In contrast, the command set kubectl create is the command you use to create a Kubernetes resource directly at the command line. This is an imperative usage. You can also use kubectl create against a manifest file to create a new instance of the resource. However, if the resource already exists, you will get an error.

Example of kubectl apply

Let's explore the details of both kubectl usages. First, let's look at kubectl apply. Listing 1 below is a manifest file that describes a Kubernetes deployment that has three replicas of a nginx container image.

apiVersion: apps/v1
kind: Deployment
metadata:
  name: mydeployment
  labels:
    app: nginx
spec:
  replicas: 3
  selector:
    matchLabels:
      app: nginx
  template:
    metadata:
      labels:
        app: nginx
    spec:
      containers:
      - name: nginx
        image: nginx:latest
        ports:
        - containerPort: 80

The name of the deployment manifest file in Listing 1 is mydeployment.yaml. If you run the command below, it will create a deployment according to the contents of this manifest file.

kubectl apply -f mydeployment.yaml

Executing the command will create the following response:

deployment/mydeployment created

When you run the command kubectl get deployment, you'll get the following output:

NAME           READY   UP-TO-DATE   AVAILABLE   AGE
mydeployment   3/3     3            3           7m10s

Here, we've created the deployment named mydeployment, and it is running its three pods.

Example of kubectl create

Now, let's use kubectl create to try to create a deployment imperatively, like so:

kubectl create deployment mydeployment --image=nginx

When you execute the imperative command, you'll get the following result:

Error from server (AlreadyExists): deployments.apps "mydeployment" already exists

This makes sense. Remember, if you try to use kubectl create against a resource that already exists, you'll get an error.

However, let's try to execute kubectl create for a resource that doesn't exist. In this case, we'll create a Kubernetes deployment named yourdeployment. We'll create it using the following command:

kubectl create deployment yourdeployment --image=nginx

You'll get the following output, indicating success:

deployment.apps/yourdeployment created

Adjusted manifest file example

Let's adjust the first deployment we created: mydeployment. We can do this by updating the manifest file, mydeployment.yaml, as shown below in Listing 2. The number of replicas has been increased from three to four, as shown below in red.

apiVersion: apps/v1
kind: Deployment
metadata:
  name: mydeployment
  labels:
    app: nginx
spec:
  replicas: 4
  selector:
    matchLabels:
      app: nginx
  template:
    metadata:
      labels:
        app: nginx
    spec:
      containers:
      - name: nginx
        image: nginx:latest
        ports:
        - containerPort: 80

To update the deployment from three replicas to four, we execute kubectl apply, like so:

kubectl apply -f mydeployment.yaml

You'll get the following output:

deployment.apps/mydeployment configured

The output reports that the deployment has been configured. This means a change has been applied to an existing deployment. Let's run the command set kubectl get deployment to confirm the deployment is indeed running four pods. You'll get an output similar to the following:

NAME           READY   UP-TO-DATE   AVAILABLE   AGE
mydeployment   4/4     4            4           18m

The important thing to understand about kubectl create vs. kubectl apply is that you use kubectl create to create Kubernetes resources imperatively at the command-line or declaratively against a manifest file. However, you can use kubectl create declaratively only to create a new resource.

On the other hand, you use kubectl apply to create a new Kubernetes resource declaratively using a manifest file. You can also use kubectl apply to update an existing resource by changing the configuration settings in the given manifest file.

Pods- Creating pods using manifest


What are K8s Pods?

  • Kubernetes pods are the foundational unit for all higher Kubernetes objects.
  • A pod hosts one or more containers.
  • It can be created using either a command or a YAML/JSON file.
  • Use kubectl to create pods, view the running ones, modify their configuration, or terminate them. Kuberbetes will attempt to restart a failing pod by default.
  • If the pod fails to start indefinitely, we can use the kubectl describe command to know what went wrong.

Why does Kubernetes use a Pod as the smallest deployable unit, and not a single container?

While it would seem simpler to just deploy a single container directly, there are good reasons to add a layer of abstraction represented by the Pod. A container is an existing entity, which refers to a specific thing. That specific thing might be a Docker container, but it might also be a rkt container, or a VM managed by Virtlet. Each of these has different requirements.

What’s more, to manage a container, Kubernetes needs additional information, such as a restart policy, which defines what to do with a container when it terminates, or a liveness probe, which defines an action to detect if a process in a container is still alive from the application’s perspective, such as a web server responding to HTTP requests.

Instead of overloading the existing “thing” with additional properties, Kubernetes architects have decided to use a new entity, the Pod, that logically contains (wraps) one or more containers that should be managed as a single entity.

Why does Kubernetes allow more than one container in a Pod?

Containers in a Pod run on a “logical host”; they use the same network namespace (in other words, the same IP address and port space), and the same IPC namespace. They can also use shared volumes. These properties make it possible for these containers to efficiently communicate, ensuring data locality. Also, Pods enable you to manage several tightly coupled application containers as a single unit.

So if an application needs several containers running on the same host, why not just make a single container with everything you need? Well first, you’re likely to violate the “one process per container” principle. This is important because with multiple processes in the same container it is harder to troubleshoot the container. That is because logs from different processes will be mixed together and it is harder manage the processes lifecycle. For example to take care of “zombie” processes when their parent process dies. Second, using several containers for an application is simpler, more transparent, and enables decoupling software dependencies. Also, more granular containers can be reused between teams.

Creating Pod using a Manifest(yaml file)

step 1. 

create the the yaml file(Pod Manifest)

$ vi myfirstpod.yml

Add the below code in green and save


apiVersion: v1      # apiVersion: this is the version of the API used by the cluster. 

                    # With new versions of Kubernetes being released, new functionality is introduced and, hence, new API versions may be defined. 

                    # For the pod object, we use API version v1.


kind: Pod           


metadata:           # Metadata: here we can define data about the object we are about to create.

  name: webserver   # In this example, we only provide the name of the pod. But you can provide other details like the namespace.

spec:               #The spec part defines the characteristics that a given Kubernetes object should have. 

                    # It is the cluster’s responsibility to update the status of the object to always match the desired configuration. 

                    # In our example, the spec instructs that this object (the pod) should have one container with some attributes.

  containers:

  - name: webserver  # The name that this container will have.

    image: nginx:latest # The image on which it is based.

    ports:               # The port(s) that will be open.

    - containerPort: 80

Kubernetes API reference: https://kubernetes.io/docs/reference/kubernetes-api/workload-resources/

step 2. 

Create the pod using kubectl create

$ kubectl create -f myfirstpod.yml

pod/webserver created

$ kubectl get pod

NAME        READY   STATUS    RESTARTS   AGE

webserver   1/1     Running   0          18s

Note: You can also use kubectl apply

Which Node Is This Pod Running On?

kubectl get pods -o wide
$ kubectl describe po webserver
Name:               webserver
Namespace:          default
Priority:           0
PriorityClassName:  <none>
Node:               gke-standard-cluster-1-default-pool-78257330-5hs8/10.128.0.3
Start Time:         Thu, 28 Nov 2019 13:02:19 +0530
Labels:             <none>
Annotations:        kubectl.kubernetes.io/last-applied-configuration:
                      {"apiVersion":"v1","kind":"Pod","metadata":{"annotations":{},"name":"webserver","namespace":"default"},"spec":{"containers":[{"image":"ngi...
                    kubernetes.io/limit-ranger: LimitRanger plugin set: cpu request for container webserver
Status:             Running
IP:                 10.8.0.3
Containers:
  webserver:
    Container ID:   docker://ff06c3e6877724ec706485374936ac6163aff10822246a40093eb82b9113189c
    Image:          nginx:latest
    Image ID:       docker-pullable://nginx@sha256:189cce606b29fb2a33ebc2fcecfa8e33b0b99740da4737133cdbcee92f3aba0a
    Port:           80/TCP
    Host Port:      0/TCP
    State:          Running
      Started:      Thu, 28 Nov 2019 13:02:25 +0530
    Ready:          True
    Restart Count:  0
    Requests:
      cpu:        100m
    Environment:  <none>
    Mounts:
      /var/run/secrets/kubernetes.io/serviceaccount from default-token-mpxxg (ro)
Conditions:
  Type              Status
  Initialized       True
  Ready             True
  ContainersReady   True
  PodScheduled      True
Volumes:
  default-token-mpxxg:
    Type:        Secret (a volume populated by a Secret)
    SecretName:  default-token-mpxxg
    Optional:    false
QoS Class:       Burstable
Node-Selectors:  <none>
Tolerations:     node.kubernetes.io/not-ready:NoExecute for 300s
                 node.kubernetes.io/unreachable:NoExecute for 300s
Events:
  Type    Reason     Age    From                                                        Message
  ----    ------     ----   ----                                                        -------
  Normal  Scheduled  2m54s  default-scheduler                                           Successfully assigned default/webserver to gke-standard-cluster-1-default-pool-78257330-5hs8
  Normal  Pulling    2m53s  kubelet, gke-standard-cluster-1-default-pool-78257330-5hs8  pulling image "nginx:latest"
  Normal  Pulled     2m50s  kubelet, gke-standard-cluster-1-default-pool-78257330-5hs8  Successfully pulled image "nginx:latest"
  Normal  Created    2m48s  kubelet, gke-standard-cluster-1-default-pool-78257330-5hs8  Created container
  Normal  Started    2m48s  kubelet, gke-standard-cluster-1-default-pool-78257330-5hs8  Started container

Output in JSON

$ kubectl get pods -o json
{
    "apiVersion": "v1",
    "items": [
        {
            "apiVersion": "v1",
            "kind": "Pod",
            "metadata": {
                "annotations": {
                    "kubectl.kubernetes.io/last-applied-configuration": "{\"apiVersion\":\"v1\",\"kind\":\"Pod\",\"metadata\":{\"annotations\":{},\"name\":\"webserver\",\"namespace\":\"default\"},\"spec\":{\"con
tainers\":[{\"image\":\"nginx:latest\",\"name\":\"webserver\",\"ports\":[{\"containerPort\":80}]}]}}\n",
                    "kubernetes.io/limit-ranger": "LimitRanger plugin set: cpu request for container webserver"
                },
                "creationTimestamp": "2019-11-28T08:48:28Z",
                "name": "webserver",
                "namespace": "default",
                "resourceVersion": "20080",
                "selfLink": "/api/v1/namespaces/default/pods/webserver",
                "uid": "d8e0b56b-11bb-11ea-a1bf-42010a800006"
            },
            "spec": {
                "containers": [
                    {
                        "image": "nginx:latest",
                        "imagePullPolicy": "Always",
                        "name": "webserver",
                        "ports": [
                            {
                                "containerPort": 80,
                                "protocol": "TCP"
                            }
                        ],
                        "resources": {
                            "requests": {
                                "cpu": "100m"
                            }
                        },
                        "terminationMessagePath": "/dev/termination-log",
                        "terminationMessagePolicy": "File",
             

Executing Commands Against Pods(log into the container)

$ kubectl exec -it webserver -- /bin/bash
root@webserver:/#
root@webserver:/# cat /etc/os-release
PRETTY_NAME="Debian GNU/Linux 10 (buster)"
NAME="Debian GNU/Linux"
VERSION_ID="10"
VERSION="10 (buster)"
VERSION_CODENAME=buster
ID=debian
HOME_URL="https://www.debian.org/"
SUPPORT_URL="https://www.debian.org/support"
BUG_REPORT_URL="https://bugs.debian.org/"

Please exit from the shell (/bin/bash) session.

root@webserver:/# exit

Deleting the Pod by deleting the manifest

$ kubectl delete -f myfirstpod.yaml
pod "webserver" deleted

$ kubectl get po -o wide
No resources found.

Get logs of Pod

$ kubectl logs webserver

/docker-entrypoint.sh: /docker-entrypoint.d/ is not empty, will attempt to perform configuration
/docker-entrypoint.sh: Looking for shell scripts in /docker-entrypoint.d/
/docker-entrypoint.sh: Launching /docker-entrypoint.d/10-listen-on-ipv6-by-default.sh
10-listen-on-ipv6-by-default.sh: Getting the checksum of /etc/nginx/conf.d/default.conf
10-listen-on-ipv6-by-default.sh: Enabled listen on IPv6 in /etc/nginx/conf.d/default.conf
/docker-entrypoint.sh: Launching /docker-entrypoint.d/20-envsubst-on-templates.sh
/docker-entrypoint.sh: Configuration complete; ready for start up

Monday, 21 February 2022

Best Practices to Reduce Docker Images Size


Best Practices to Reduce Docker Images Size

Docker images are an essential component for building Docker containers. Although closely related, there are major differences between containers and Docker images. A Docker image serves as the base of a container. Docker images are created by writing Dockerfiles – lists of instructions automatically executed for creating a specific Docker image. When building a Docker image, you may want to make sure to keep it light. Avoiding large images speed up the build and deployment of containers and hence, it is critical to reducing the image size of images to a minimum.

Here are some basic steps recommended to follow, which will help create smaller and more efficient Docker images.

1. USE A SMALLER BASE IMAGE

FROM ubuntu

The above command will set your image size to 128MB at the outset. Consider using smaller base images. For each apt-get installer or yum install line you add in your Dockerfile, you will be increasing the image size based on the size of the library is added. Realize that you probably don’t need many of those libraries that you are installing. Identify the ones you really need and install only those.

For example, by considering an alpine base image, the size of the image will get reduced to 5MB from 128MB.

2. DON’T INSTALL DEBUG TOOLS LIKE curl/vim/nano

Many developers will use the curl/vim tools inside the Dockerfiles for later debugging  purposes inside the container. The image size will further increase because of these debugging tools.

Note: It is recommended that install these tools only in the development Dockerfile and remove it once the development is completed and is ready for deployment to staging or production environments.

3. MINIMIZE LAYERS

Try to minimize the number of layers to install the packages in the Dockerfile. Otherwise, this may cause each step in the build process to increase the size of the image.

FROM debian
RUN apt-get install -y<packageA>
RUN apt-get install -y<packageB>

Try to install all the packages on a single RUN command to reduce the number of steps in the build process and reduce the size of the image.

FROM debian
RUN apt-get install -y<packageA><packageB>

Note: Using this method, you will need to rebuild the entire image each time you add a new package to install.

4. USE –no-install-recommends ON apt-get install

Adding  no-install-recommends to apt-get install -y can help dramatically reduce  the size by avoiding installing packages that aren’t technically dependencies but are recommended to be installed alongside  packages.

Note: apk add commands should have–no-cache added.

5. ADD rm -rf /var/lib/apt/lists/* TO SAME LAYER AS apt-get installs

Add rm -rf /var/lib/apt/lists/* at the end of the apt-get -y install to clean up after install packages. (For yum, use yum clean all)

If you are to install wget or curl to download some package, remember to combine them all in one RUN statement. At the end of the run, the statement performs apt-get remove curl or wget, once you no longer need them.

6. USE fromlatest.io

From Latest will Lint your Dockerfile and check for even more steps you can perform to reduce your image size.

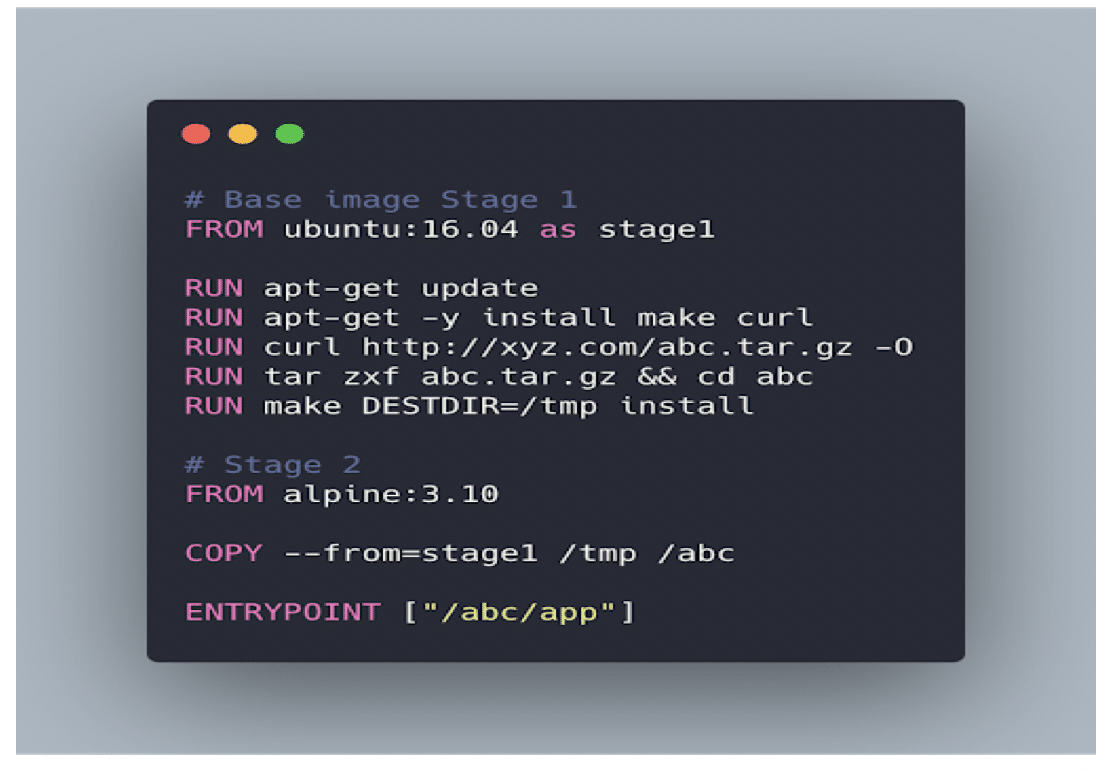
7. MULTI-STAGE BUILDS IN DOCKER

The multi-stage build divides Dockerfile into multiple stages to pass the required artifact from one stage to another and eventually deliver the final artifact in the last stage. This way, our final image won’t have any unnecessary content except the required artifact.

CONCLUSION

Smaller the image size better the resource utilization and faster the operations. By carefully selecting and building image components by following the recommendations in this article, one can easily save space and build efficient and reliable Docker images. 

Saturday, 19 February 2022

How to Dockerize Any App


There are already many tutorials on how to dockerize applications available on the internet, so why I am writing another one?

Most of the tutorials I see are focused on a specific technology (say Java or Python) which may not cover what you need. They also do not address all the relevant aspects that are necessary to establish a well defined contract between Dev and Ops teams (which is what containerization is all about).

I compiled the steps below based on my recent experiences and lessons learned. It is a checklist of details and things that are overlooked by the other guides you will see around.

Disclaimer: This is NOT a beginners guide. I recommend you learn the basics of how to setup and use docker at first, and come back here after you have created and launched a few containers.

Let’s get started.

1. Choose a base Image

There are many technology specific base images, such as:

If none of they works for you, you need to start from a Base OS and install everything by yourself.

Most of the tutorials out there, will start with Ubuntu (e.g. ubuntu:16.04), which is not necessarily wrong.

My advice is for you to consider to use Alpine images:

https://hub.docker.com/_/alpine/

They provide a much smaller base image (as small as 5 MB).

Note: “apt-get” commands will not work on those images. Alpine use its own package repository and tool. For details see:

https://wiki.alpinelinux.org/wiki/Alpine_Linux_package_management

https://pkgs.alpinelinux.org/packages

2. Install the necessary packages

This is usually trivial. Some details you may be missing:

a-) You need to write apt-get update and apt-get install on the same line (same if you are using apk on Alpine). This is not only a common practice, you need to do it, otherwise the “apt-get update” temporary image (layer) can be cached and may not update the package information you need immediately after (see this discussion https://forums.docker.com/t/dockerfile-run-apt-get-install-all-packages-at-once-or-one-by-one/17191).

b-) Double check if you are installing ONLY what you really need (assuming you will run the container on production). I have seen people installing vim and other development tools inside their images.

If necessary, create a different Dockerfile for build/debugging/development time. This is not only about image size, think about security, maintainability and so on.

3. Add your custom files

A few hints to improve your Dockerfiles:

a-) Understand the different between COPY and ADD:

https://docs.docker.com/develop/develop-images/dockerfile_best-practices/#add-or-copy

b-) (Try to) Follow File System conventions on where to place your files:

http://www.pathname.com/fhs/

E.g. for interpreted applications (PHP, Python), use /usr/src folder.

c-) Check the attributes of the files you are adding. If you need execution permission, there is no need to add a new layer on your image (RUN chmod +x …). Just fix the original attributes on your code repository.

There is no excuse for that, even if you are using Windows, see:

4. Define which user will (or can) run your container

First, take a break and read the following great article:

After reading this you will understand that:

a-) You only need to run your container with a specific (fixed ID) user if your application need access to the user or group tables (/etc/passwd or /etc/group).

b-) Avoid running your container as root as much as possible.

Unfortunately, it is not hard to find popular applications requiring you to run them with specific ids (e.g. Elastic Search with uid:gid = 1000:1000).

Try not to be another one…

5. Define the exposed ports

This is usually a very trivial process, please, just don’t create the need for your container to run as root because you want it to expose a privileged low port (80). Just expose a non privileged port (e.g. 8080) and map it during the container execution.

This differentiation comes from a long time ago:

https://www.w3.org/Daemon/User/Installation/PrivilegedPorts.html

6. Define the entrypoint

The vanilla way: just run your executable file, right away.

A better way: create a “docker-entrypoint.sh” script where you can hook things like configuration using environment variables (more about this below):

This is a very common practice, a few examples:

7. Define a Configuration method

Every application requires some kind of parametrization. There are basically two paths you can follow:

1-) Use an application specific configuration file: them you will need to document the format, fields, location and so on (not good if you have a complex environment, with applications spanning different technologies).

2-) Use (operating system) Environment variables: Simple and efficient.

If you think this is not modern or recommended approach, remember this is part of The Twelve-Factors:

This does not mean that you need to throw away your configuration files and refactor the config mechanism of your application.

Just use a simple envsubst command to replace a configuration template (inside the docker-entrypoint.sh, because it needs to be performed on run time).

Example:

This will encapsulate the application specific configuration file, layout an details inside the container.

8. Externalize your data

The golden rule is: do not save any persistent data inside the container.

The container file system is supposed and intended to be temporary, ephemeral. So any user generated content, data files, process output should be saved either on a mounted volume or on a bind mounts (that is, on a folder on the Base OS linked inside the container).

I honestly do not have a lot of experience on mounted volumes, I have always preferred to save data on a bind mounts, using a previously created folder carefully defined using a configuration management tool (such as Salt Stack).

As carefully created, I mean the following:

  1. I create a non privileged user (and group) on the Base OS.
  2. All bind folders (-v) are created using this user as owner.
  3. Permissions are given accordingly (only to this specific user and group, other users will have no access to that).
  4. The container will be run with this user.
  5. You will be in full control of that.

9. Make sure you handle the logs as well

I am aware that my previous “persistent data” is far from being a precise definition, and logs sometimes fall into the grey area. How should you handle them?

If you are creating a new app and want it to stick to docker conventions, no logs files should be written at all. The application should use stdout and stderr as an event stream. Just like the environment variables recommendation, it is also one of The Twelve-Factors. See:

Docker will automatically capture everything you are sending to stdout and make it available through “docker logs” command:

https://docs.docker.com/engine/reference/commandline/logs/

There are some practical cases where this is particularly difficult though. If you are running a simple nginx container, you will have at least two different types of log files:

  • HTTP Access Logs
  • Error Logs

With different structures, configurations and pre existing implementations, it may not be trivial to pipe them on the standard output.

In this case, just handle the log files as described on the previous section, And make sure you rotate them.

10. Rotate logs and other append only files

If your application is writing log files or appending any files that can grow indefinitely, you need to worry about file rotation.

This is critical for you to prevent the server running out of space, apply data retention policies (which is critical when it comes to GDPR and other data regulations).

If you are using bind mounts, you can count on some help from the Base OS and use the same tools you would use for a local rotation configuration, that is logrotate 

Friday, 18 February 2022

How to upgrade Maven

  java.lang.IllegalStateException I had installed maven in my ubuntu using command  apt install maven This installed maven in path /usr/shar...