Friday, 21 November 2025

How to install Google ADK(Agent Development Kit) on Windows

 This guide shows you how to get up and running with Agent Development Kit (ADK) for Python. Before you start, make sure you have the following installed:

  • Python 3.9 or later
  • pip for installing packages

Installation

In Your Terminal


Install ADK by running the following command:

pip install google-adk

STEP 1 — Find where pip put the ADK package

Run:

pip show adk

If that fails

Run:

pip show google-adk

You should see something like:

C:\Users\<name>\AppData\Roaming\Python\Python312

Add ADK Scripts folder to Windows PATH

  1. Press Win + R → type:

    sysdm.cpl
  2. Go to Advanced → Environment Variables

  3. Under User variables or System variables, find:

    Path

  4. Click Edit → New


  1. Add your path:

    C:\Users\Admin\AppData\Roaming\Python\Python314\Scripts
  2. Click OK on every window


  3. Close and reopen PowerShell or Git Bash

Create an agent project

Run the adk create command to start a new agent project.

adk create my_agent

Explore the agent project

The created agent project has the following structure, with the agent.py file containing the main control code for the agent.

my_agent/
    agent.py      # main agent code
    .env          # API keys or project IDs
    __init__.py

Update your agent project

The agent.py file contains a root_agent definition which is the only required element of an ADK agent. You can also define tools for the agent to use. Update the generated agent.py code to include a get_current_time tool for use by the agent, as shown in the following code:

from google.adk.agents.llm_agent import Agent

# Mock tool implementation
def get_current_time(city: str) -> dict:
    """Returns the current time in a specified city."""
    return {"status": "success", "city": city, "time": "10:30 AM"}

root_agent = Agent(
    model='gemini-3-pro-preview',
    name='root_agent',
    description="Tells the current time in a specified city.",
    instruction="You are a helpful assistant that tells the current time in cities. Use the 'get_current_time' tool for this purpose.",
    tools=[get_current_time],
)

Set your API key

This project uses the Gemini API, which requires an API key. If you don't already have Gemini API key, create a key in Google AI Studio on the API Keys page.

In a terminal window, write your API key into an .env file as an environment variable:

Update: my_agent/.env
echo 'GOOGLE_API_KEY="YOUR_API_KEY"' > .env
Using other AI models with ADK

ADK supports the use of many generative AI models. For more information on configuring other models in ADK agents, see Models & Authentication.

Run your agent

You can run your ADK agent with an interactive command-line interface using the adk run command or the ADK web user interface provided by the ADK using the adk web command. Both these options allow you to test and interact with your agent.

Run with command-line interface

Run your agent using the adk run command-line tool.

adk run my_agent

adk-run.png

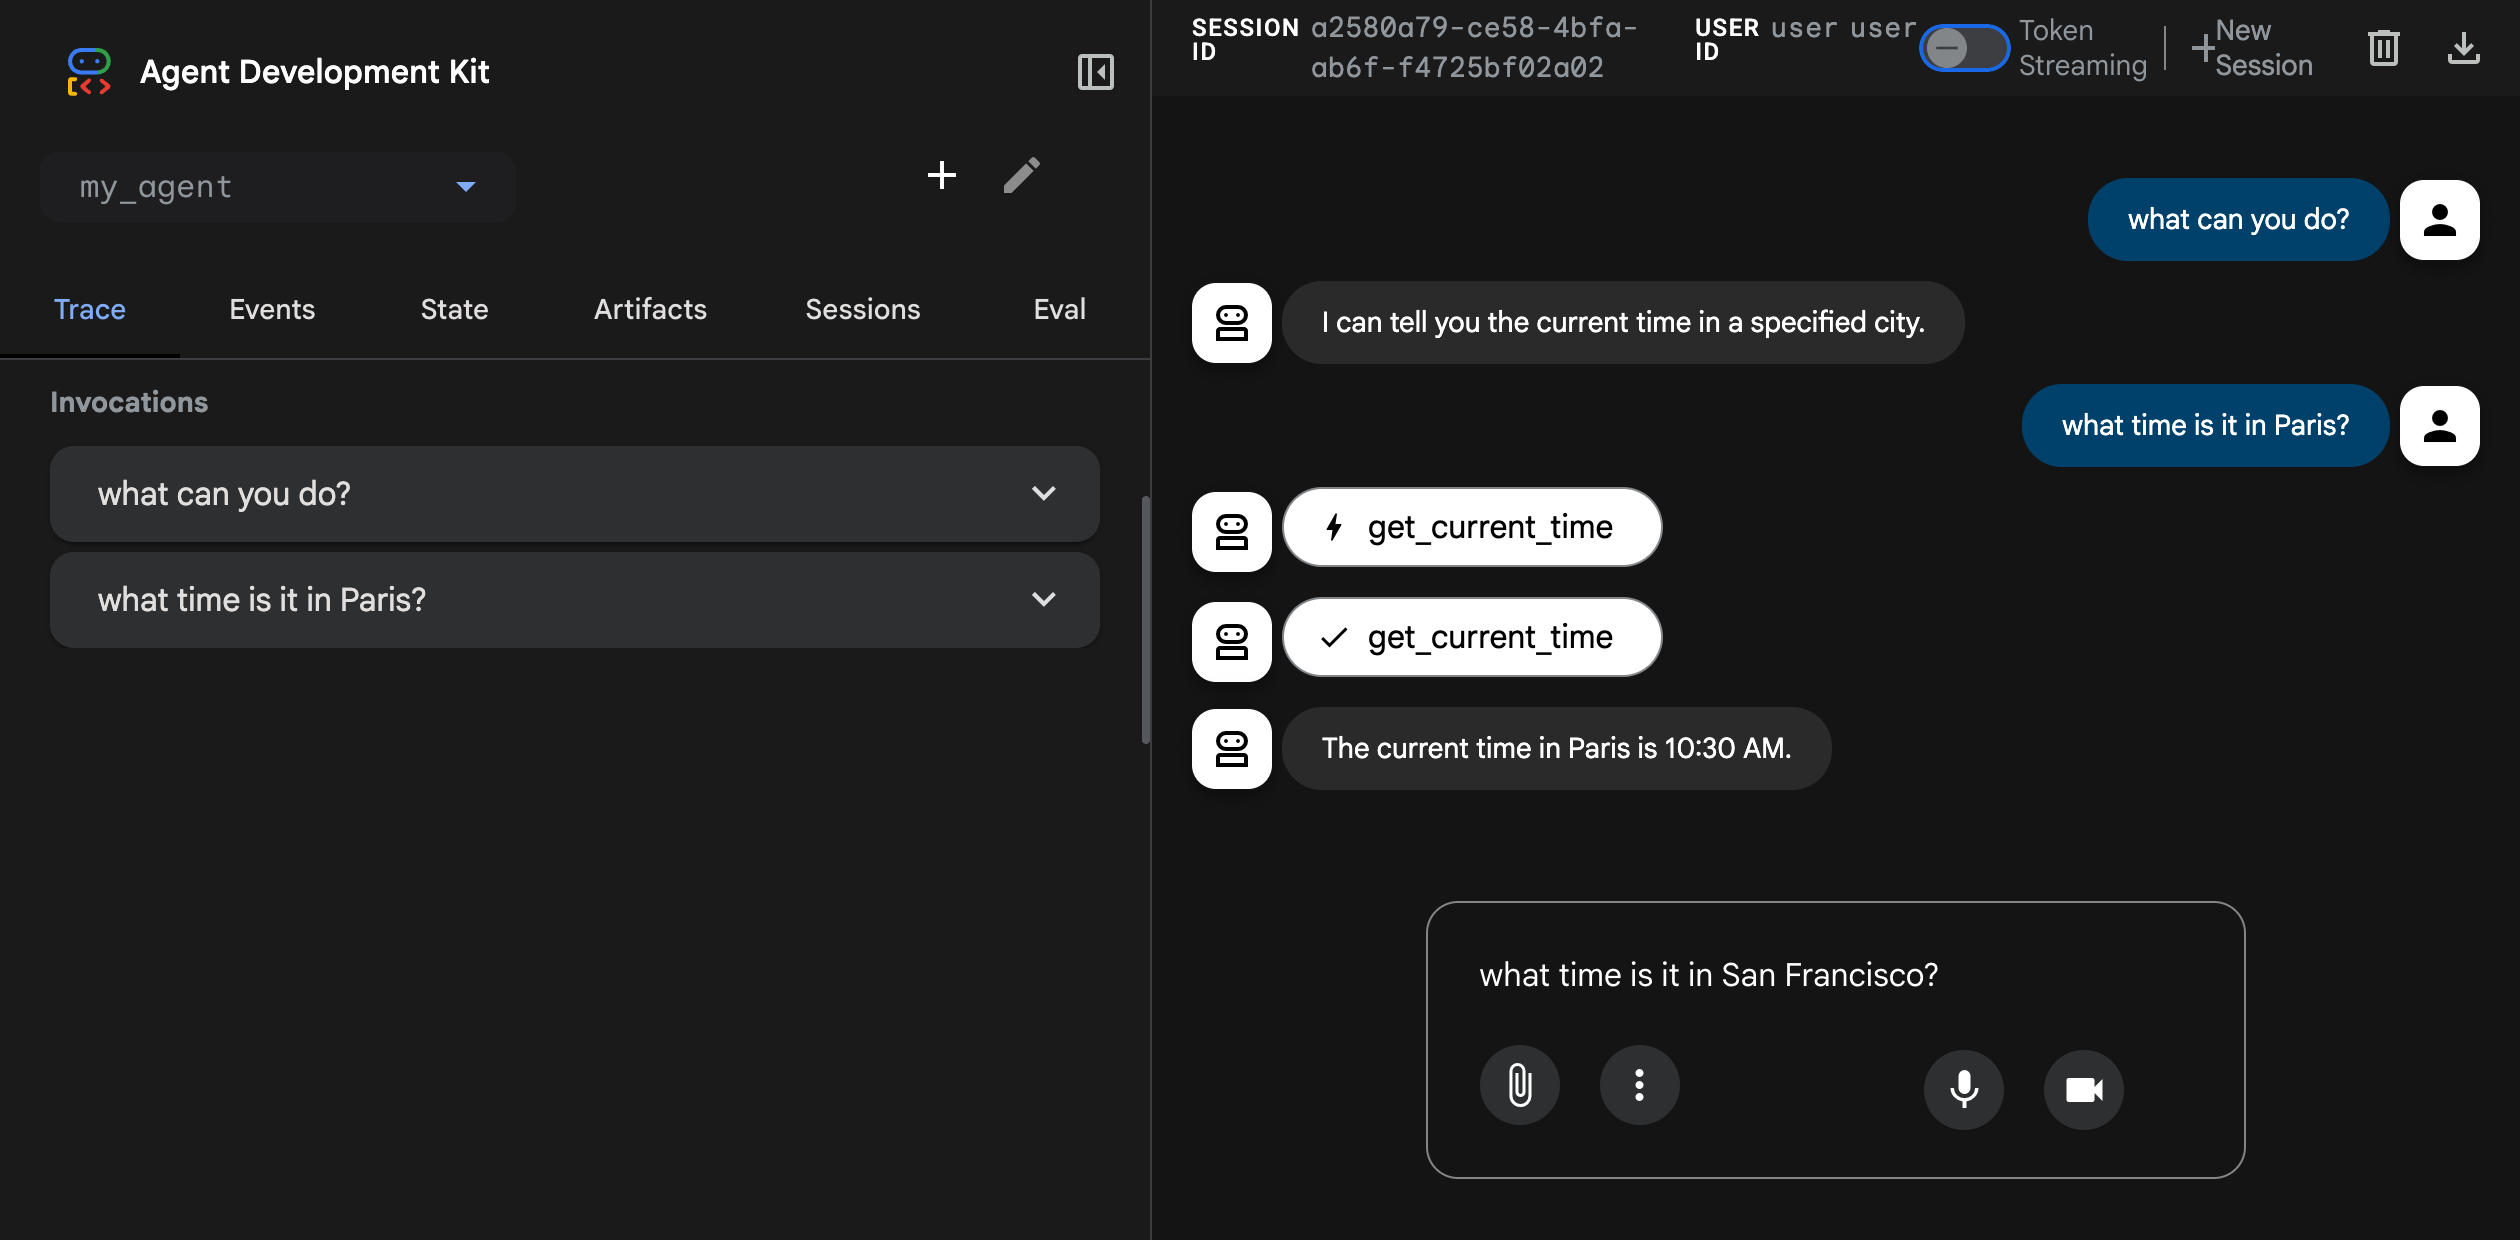
Run with web interface

The ADK framework provides web interface you can use to test and interact with your agent. You can start the web interface using the following command:

adk web --port 8000

Note

Run this command from the parent directory that contains your my_agent/ folder. For example, if your agent is inside agents/my_agent/, run adk web from the agents/ directory.

This command starts a web server with a chat interface for your agent. You can access the web interface at (http://localhost:8000). Select the agent at the upper left corner and type a request.

adk-web-dev-ui-chat.png

What is the Model Context Protocol (MCP)

MCP (Model Context Protocol) is an open-source standard for connecting AI applications to external systems.Using MCP, AI applications like Claude or ChatGPT can connect to data sources (e.g. local files, databases), tools (e.g. search engines, calculators) and workflows (e.g. specialized prompts)—enabling them to access key information and perform tasks.Think of MCP like a USB-C port for AI applications. Just as USB-C provides a standardized way to connect electronic devices, MCP provides a standardized way to connect AI applications to external systems.

What can MCP enable?

  • Agents can access your Google Calendar and Notion, acting as a more personalized AI assistant.
  • Claude Code can generate an entire web app using a Figma design.
  • Enterprise chatbots can connect to multiple databases across an organization, empowering users to analyze data using chat.
  • AI models can create 3D designs on Blender and print them out using a 3D printer.

Why does MCP matter?

Depending on where you sit in the ecosystem, MCP can have a range of benefits.
  • Developers: MCP reduces development time and complexity when building, or integrating with, an AI application or agent.
  • AI applications or agents: MCP provides access to an ecosystem of data sources, tools and apps which will enhance capabilities and improve the end-user experience.
  • End-users: MCP results in more capable AI applications or agents which can access your data and take actions on your behalf when necessary.

Sunday, 16 November 2025

How to Use AI Effectively: The A.I.M. Framework (Actor • Intent • Mission)


Using AI isn’t just about typing prompts — it’s about thinking strategically so the AI can produce its best work for you. Whether you're a student, a creator, an analyst, a business owner, or someone simply exploring AI for the first time, mastering the A.I.M. Framework will transform the quality of your results.

Below is your complete guide to A.I.MActor, Intent, Mission — along with visuals to help you understand and apply it immediately.


🔥 Introduction: Why You Need a Framework for AI

Most people use AI like a search engine:
They ask a quick question… and hope for the best.

But AI is not Google.
AI thinks with you, shapes ideas with you, and creates outputs based on how clearly you define the roles and goals.

That’s why you need a framework — A.I.M.


🎯 The A.I.M. Framework

A.I.M stands for:

A — Actor

Tell AI who it should be.

I — Intent

Tell AI what you’re trying to do.

M — Mission

Tell AI what exact output or result you need.

When you define these three elements, AI behaves like a specialist, not a generic assistant.


A — ACTOR (Define the Role)

Start by assigning AI a role, persona, or expertise.

Examples:

  • Act as a senior cloud architect…

  • You are my marketing strategist…

  • Act as my expert DevOps consultant…

  • You are a world-class resume writer…

Why it works:
Roles give AI context — which raises the quality, relevance, and depth of your answers.


I — INTENT (State Your Objective)

Intent explains why you are asking.

Examples:

  • I want to troubleshoot an AWS issue…

  • I want to create a landing page that converts…

  • I’m trying to learn Kubernetes basics…

This tells AI the direction to think in.


M — MISSION (Specify the Final Deliverable)

The mission is the exact format you want.

Examples:

  • Give me a step-by-step guide.

  • Create a blog post with headers and bullet points.

  • Generate a PowerPoint outline.

  • Produce a comparison table between AWS, Azure, and GCP.

  • Write the email in a friendly but professional tone.

When your mission is clear, the output becomes instantly usable.


🔧 Putting It All Together (Example Prompt)

Here’s how a weak prompt becomes an expert-level one:

❌ Weak Prompt

“Explain Kubernetes.”

✅ A.I.M. Prompt

Actor: Act as a senior Kubernetes trainer.
Intent: I’m preparing for an interview and need to strengthen my fundamentals.
Mission: Give me a clear explanation with diagrams, analogies, and a 10-question practice quiz.

See the difference?
One triggers basic info.
The other triggers expertise.


📊 Visual Reinforcement


🚀 Why A.I.M. Works Everywhere

You can use A.I.M. for:

  • Writing emails

  • Creating business plans

  • Debugging code

  • Learning new skills

  • Building creative content

  • Improving processes

  • Studying complex topics

  • Planning marketing campaigns

  • Writing job applications

  • Interview preparation

  • Research summaries

AI becomes clearer, faster, and more powerful when you give it structure.


🧠 Tips for Mastering AI with A.I.M.

1. Always define the Actor first

AI behaves differently depending on the role.

2. Write your Intent in plain language

You don’t have to be fancy — just tell it why.

3. Treat the Mission like instructions to a designer

Formats matter. Specify them.

4. Iterate

You can always say:
Revise this.
Make it shorter.
Improve this section.
Add visuals.

AI is a collaborator — not a vending machine.


🏁 Conclusion

The A.I.M. Framework is the fastest way to get powerful, accurate, and tailored responses from AI. When you define the Actor, clarify your Intent, and specify your Mission, you transform AI into a high-level partner who understands exactly what you need.

Use A.I.M. daily — and your AI skills will multiply.

Bash Script to Install Artifactory in Ubuntu 22

JFrog Artifactory OSS 7.21.5 — Install (Bash Script) This script installs Artifactory OSS (no Docker, no Pro, works on Ubuntu 22 EC2). ...