DevOps Training Program that will provide you with in-depth knowledge of various DevOps tools including Git, Jenkins, Docker, Ansible, Puppet, Kubernetes and Nagios. This training is completely hands-on and designed in a way to help you become a certified practitioner through best practices in Continuous Development, Continuous Testing, Configuration Management and Continuous Integration, and finally, Continuous Monitoring of software throughout its development life cycle.
Store and Encrypt Credentials in Jenkins (Access and Secret Key)
In this step, we will be storing and encrypting the access and secret key in Jenkins to maximize security and minimize the chances of exposing our credentials.
Go to Manage Jenkins > Manage Credentials > Click on Jenkins the highlighted link as shown below
Select Add Credentials
Choose Secret text in the Kind field
Enter the following below:
Note: Modify the yellow highlighted text with the right value.
Welcome to today’s guide on how to install Ansible AWX on Ubuntu 20.04|18.04 with Nginx Reverse Proxy and optional Let’s Encrypt SSL Certificate. Ansible AWX is an open source tool which provides a web-based user interface, REST API, and task engine for easy and collaborative management of Ansible Playbooks and Inventories.
AWX allows you to centrally manage Ansible playbooks, inventories, Secrets, and scheduled jobs from a web interface. It is easy to install AWX on Ubuntu 20.04|18.04 (Bionic Beaver) Linux system. Use the steps shared below to install and configure Ansible AWX on Ubuntu 20.04|18.04 Linux server.
Starting in version 18.0 of AWX, the recommended installation method is via AWX Operator. As the operator installation method requires a Kubernetes Cluster, we will perform a single node Kubernetes installation on Ubuntu Linux using k3s.
We will deploy a single node kubernetes using k3s lightweight tool. K3s is a certified Kubernetes distribution designed for production workloads in unattended, resource-constrained environments. The good thing with k3s is that you can add more Worker nodes at later stage if need arises.
K3s provides an installation script that is a convenient way to install it as a service on systemd or openrc based systems
Let’s run the following command to install K3s on our Ubuntu system:
[INFO]  Finding release for channel stable
[INFO]  Using v1.21.3+k3s1 as release
[INFO]  Downloading hash https://github.com/k3s-io/k3s/releases/download/v1.21.3+k3s1/sha256sum-amd64.txt
[INFO]  Downloading binary https://github.com/k3s-io/k3s/releases/download/v1.21.3+k3s1/k3s
[INFO]  Verifying binary download
[INFO]  Installing k3s to /usr/local/bin/k3s
[INFO]  Creating /usr/local/bin/kubectl symlink to k3s
[INFO]  Creating /usr/local/bin/crictl symlink to k3s
[INFO]  Creating /usr/local/bin/ctr symlink to k3s
[INFO]  Creating killall script /usr/local/bin/k3s-killall.sh
[INFO]  Creating uninstall script /usr/local/bin/k3s-uninstall.sh
[INFO]  env: Creating environment file /etc/systemd/system/k3s.service.env
[INFO]  systemd: Creating service file /etc/systemd/system/k3s.service
[INFO]  systemd: Enabling k3s unit
Created symlink /etc/systemd/system/multi-user.target.wants/k3s.service → /etc/systemd/system/k3s.service.
[INFO]  systemd: Starting k3s
Validate K3sinstallation:
The next step is to validate our installation of K3s using kubectl command which was installed and configured by installer script.
$ kubectl get nodes
NAME        STATUS   ROLES                  AGE   VERSION
ubuntu-01   Ready    control-plane,master   33s   v1.22.5+k3s1
You can also confirm Kubernetes version deployed using the following command:
$ kubectl version --short
Client Version: v1.22.5+k3s1
Server Version: v1.22.5+k3s1
The K3s service will be configured to automatically restart after node reboots or if the process crashes or is killed.
Step 3: Deploy AWX Operator on Kubernetes
This Kubernetes Operator has to be deployed in your Kubernetes cluster, which in our case is powered by K3s. The operator we’ll deploy can manage one or more AWX instances in any namespace.
Save the latest version from AWX Operator releases as RELEASE_TAG variable then checkout to the branch using git.
sudo apt update
git checkout 0.17.0
Deploy AWX Operator into your cluster:
# export NAMESPACE=awx
# make deploy
Command output:
cd config/manager && /root/awx-operator/bin/kustomize edit set image controller=quay.io/ansible/awx-operator:0.14.0
cd config/default && /root/awx-operator/bin/kustomize edit set namespace awx
/root/awx-operator/bin/kustomize build config/default | kubectl apply -f -
Warning: resource namespaces/awx is missing the kubectl.kubernetes.io/last-applied-configuration annotation which is required by kubectl apply. kubectl apply should only be used on resources created declaratively by either kubectl create --save-config or kubectl apply. The missing annotation will be patched automatically.
namespace/awx configured
customresourcedefinition.apiextensions.k8s.io/awxbackups.awx.ansible.com created
customresourcedefinition.apiextensions.k8s.io/awxrestores.awx.ansible.com created
customresourcedefinition.apiextensions.k8s.io/awxs.awx.ansible.com created
serviceaccount/awx-operator-controller-manager created
role.rbac.authorization.k8s.io/awx-operator-leader-election-role created
role.rbac.authorization.k8s.io/awx-operator-manager-role created
clusterrole.rbac.authorization.k8s.io/awx-operator-metrics-reader created
clusterrole.rbac.authorization.k8s.io/awx-operator-proxy-role created
rolebinding.rbac.authorization.k8s.io/awx-operator-leader-election-rolebinding created
rolebinding.rbac.authorization.k8s.io/awx-operator-manager-rolebinding created
clusterrolebinding.rbac.authorization.k8s.io/awx-operator-proxy-rolebinding created
configmap/awx-operator-manager-config created
service/awx-operator-controller-manager-metrics-service created
deployment.apps/awx-operator-controller-manager created
Wait a few minutes and awx-operator should be running:
# kubectl get pods
NAME                                               READY   STATUS    RESTARTS   AGE
awx-operator-controller-manager-68d787cfbd-z75n4   2/2     Running   0          40s
How To Uninstalling AWX Operator (Don’t run this unless you’re sure it uninstalls!“
You can always remove the operator and all associated CRDs by running the command below:
We have defined resource name as awx and service type as nodeport to enable us access AWX from the Node IP address and given port. We also added extra PV mount on the web server pod.
Apply configuration manifest file:
$ kubectl apply -f awx-deploy.yml
awx.awx.ansible.com/awx created
Wait a few minutes then check AWX instance deployed:
$ watch kubectl get pods -l "app.kubernetes.io/managed-by=awx-operator"
NAME                   READY   STATUS    RESTARTS   AGE
awx-postgres-0         1/1     Running   0          75s
awx-7c5d846c88-mjlvm   4/4     Running   0          64s
Fixing Postgres Pod in CrashLoopBackOff state
Check status of PostgreSQL Pod:
$ kubectl get pods -l "app.kubernetes.io/managed-by=awx-operator"
NAME                   READY   STATUS             RESTARTS   AGE
awx-postgres-0         0/1     CrashLoopBackOff   4          2m38s
awx-66c64f8d67-qvfk9   3/4     ImagePullBackOff   0          2m27s
$ ls /var/lib/rancher/k3s/storage/
pvc-edb29795-7dae-4a00-805f-2d989694fe3d_default_postgres-awx-postgres-0
Checking AWX Container’s logs
The awx-xxx-yyy pod will have four containers, namely:
redis
awx-web
awx-task
awx-ee
As can be seen from below command output:
# kubectl -n awx  logs awx-75698588d6-r7bxl
error: a container name must be specified for pod awx-75698588d6-r7bxl, choose one of: [redis awx-web awx-task awx-ee]
You’ll need to provide container name after the pod:
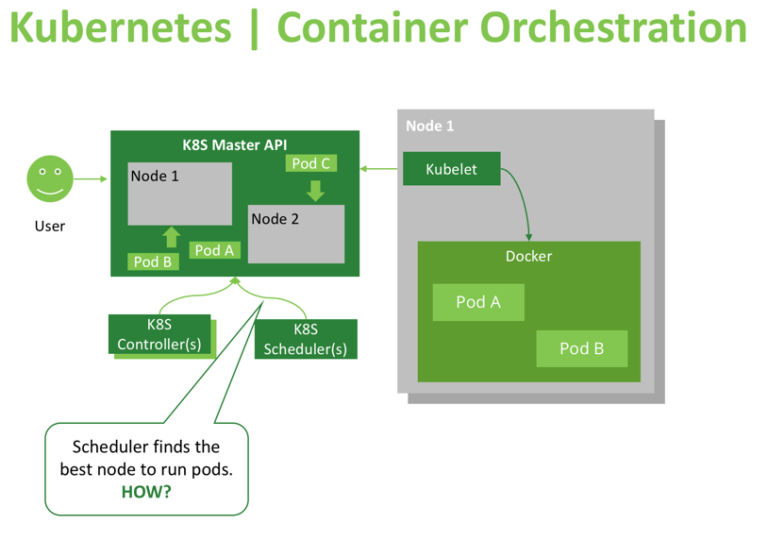
The Kubernetes Scheduler is a core component of Kubernetes: After a user or a controller creates a Pod, the Kubernetes Scheduler, monitoring the Object Store for unassigned Pods, will assign the Pod to a Node. Then, the Kubelet, monitoring the Object Store for assigned Pods, will execute the Pod.
what is the scheduler for?
The Kubernetes scheduler is in charge of scheduling pods onto nodes. Basically it works like this:
You create a pod
The scheduler notices that the new pod you created doesn’t have a node assigned to it
The scheduler assigns a node to the pod
It’s not responsible for actually running the pod – that’s the kubelet’s job. So it basically just needs to make sure every pod has a node assigned to it. Easy, right?
What is node affinity ?
In simple words this allows you to tell Kubernetes to schedule pods only to specific subsets of nodes.
The initial node affinity mechanism in early versions of Kubernetes was the nodeSelector field in the pod specification. The node had to include all the labels specified in that field to be eligible to become the target for the pod.
nodeSelector Example
First is to give the node a label
kubectl label nodes node1 mynode=worker-1
Next is to create a pod and specify the node via the label
Lets create a pod
$ vi pod.yml
apiVersion: v1 #version of the API to use
kind: Pod #What kind of object we're deploying
metadata: #information about our object we're deploying
name: nginx #Name of the pod
labels: #A tag on the pod created
env: test
spec: #specifications for our object
containers:
- name: nginx #the name of the container within the pod
image: nginx #which container image should be pulled
imagePullPolicy: IfNotPresent #image pull policy
nodeSelector: #Nodeselector condition
mynode: worker-1 # label on the node where pod is going to deploy
Then
kubectl apply -f pod.yml
This will create a pod and will deploy it on the node with label mynode=worker-1
Viewing Your Pods
kubectl get pods --output=wide
[node1 Scheduler101]$ kubectl describe po nginx
Name:               nginx
Namespace:          default
Priority:           0
PriorityClassName:  <none>
Node:               node2/192.168.0.17
Start Time:         Mon, 30 Dec 2019 16:40:53 +0000
Labels:             env=test
Annotations:        kubectl.kubernetes.io/last-applied-configuration:
                      {"apiVersion":"v1","kind":"Pod","metadata":{"annotations":{},"labels":{"env":"test"},"name":"nginx","namespace":"default"},"spec":{"contai...
Status:             Pending
IP:
Containers:
  nginx:
    Container ID:
    Image:          nginx
    Image ID:
    Port:           <none>
    Host Port:      <none>
    State:          Waiting
      Reason:       ContainerCreating
    Ready:          False
    Restart Count:  0
    Environment:    <none>
    Mounts:
      /var/run/secrets/kubernetes.io/serviceaccount from default-token-qpgxq (ro)
Conditions:
  Type              Status
  Initialized       True
  Ready             False
  ContainersReady   False
  PodScheduled      True
Volumes:
  default-token-qpgxq:
    Type:        Secret (a volume populated by a Secret)
    SecretName:  default-token-qpgxq
    Optional:    false
QoS Class:       BestEffort
Node-Selectors:  mynode=worker-1
Tolerations:     node.kubernetes.io/not-ready:NoExecute for 300s
                 node.kubernetes.io/unreachable:NoExecute for 300s
Events:
  Type    Reason     Age   From               Message
  ----    ------     ----  ----               -------
  Normal  Scheduled  7s    default-scheduler  Successfully assigned default/nginx to node2
  Normal  Pulling    3s    kubelet, node2     Pulling image "nginx"
Deleting the Pod
kubectl delete -f pod.yml
pod "nginx" deleted
Node affinity
Node affinity is conceptually similar to nodeSelector – it allows you to constrain which nodes your pod is eligible to be scheduled on, based on labels on the node.
There are currently two types of node affinity.
requiredDuringSchedulingIgnoredDuringExecution (Preferred during scheduling, ignored during execution; we are also known as “hard” requirements)
preferredDuringSchedulingIgnoredDuringExecution (Required during scheduling, ignored during execution; we are also known as “soft” requirements)
Hands On: First Label the Nodes(any two Nodes u have my ex node2, node3)
kubectl get pods --output=wide
NAME                 READY   STATUS    RESTARTS   AGE     IP          NODE          NOMINATED NODE   READINESS GATES
with-node-affinity   1/1     Running   0          9m46s   10.44.0.1   kube-slave1   <none>           <none>
[node1 Scheduler101]$ kubectl describe po
Name:               with-node-affinity
Namespace:          default
Priority:           0
PriorityClassName:  <none>
Node:               node3/192.168.0.16
Start Time:         Mon, 30 Dec 2019 19:28:33 +0000
Labels:             <none>
Annotations:        kubectl.kubernetes.io/last-applied-configuration:
                      {"apiVersion":"v1","kind":"Pod","metadata":{"annotations":{},"name":"with-node-affinity","namespace":"default"},"spec":{"affinity":{"nodeA...
Status:             Pending
IP:
Containers:
  nginx:
    Container ID:
    Image:          nginx
    Image ID:
    Port:           <none>
    Host Port:      <none>
    State:          Waiting
      Reason:       ContainerCreating
    Ready:          False
    Restart Count:  0
    Environment:    <none>
    Mounts:
      /var/run/secrets/kubernetes.io/serviceaccount from default-token-qpgxq (ro)
Conditions:
  Type              Status
  Initialized       True
  Ready             False
  ContainersReady   False
  PodScheduled      True
Volumes:
  default-token-qpgxq:
    Type:        Secret (a volume populated by a Secret)
    SecretName:  default-token-qpgxq
    Optional:    false
QoS Class:       BestEffort
Node-Selectors:  <none>
Tolerations:     node.kubernetes.io/not-ready:NoExecute for 300s
                 node.kubernetes.io/unreachable:NoExecute for 300s
Events:
  Type    Reason     Age   From               Message
  ----    ------     ----  ----               -------
  Normal  Scheduled  26s   default-scheduler  Successfully assigned default/with-node-affinity to node3
  Normal  Pulling    22s   kubelet, node3     Pulling image "nginx"
  Normal  Pulled     20s   kubelet, node3     Successfully pulled image "nginx"
  Normal  Created    2s    kubelet, node3     Created container nginx
  Normal  Started    0s    kubelet, node3     Started container nginx
Step Cleanup
Finally you can clean up the resources you created in your cluster: