Monday, 24 July 2023

How to install Helm on K3s

Helm is a package manager for Kubernetes applications. In this tutorial, we'll understand the basics of Helm and how they form a powerful tool for working with Kubernetes resources.

Over the past years, Kubernetes has grown tremendously, and so has the ecosystem supporting it. Recently, Helm has been awarded the graduated status by Cloud Native Computing Foundation (CNCF), which shows its growing popularity amongst Kubernetes users.

2. Although these terms are fairly common these days, particularly amongst those working with cloud technologies, let's go through them quickly for those unaware:

  1. ContainerContainer refers to operating system-level virtualization. Multiple containers run within an operating system in isolated user spaces. Programs running within a container have access only to resources assigned to the container.
  2. DockerDocker is a popular program to create and run containers. It comes with Docker Daemon, which is the main program managing containers. Docker Daemon offers access to its features through Docker Engine API, used by Docker Command-Line Interface (CLI). Please refer to this article for a more detailed description of Docker.
  3. KubernetesKubernetes is a popular container orchestration program. Although it's designed to work with different containers, Docker is most often used. It offers a wide selection of features, including deployment automation, scaling, and operations across a cluster of hosts. There is excellent coverage of Kubernetes in this article for further reference


  4. Helm Architecture

    Helm 2 was primarily on a client-server architecture that comprises of a client and an in-cluster server:

    AD
    Helm 2 Architecture
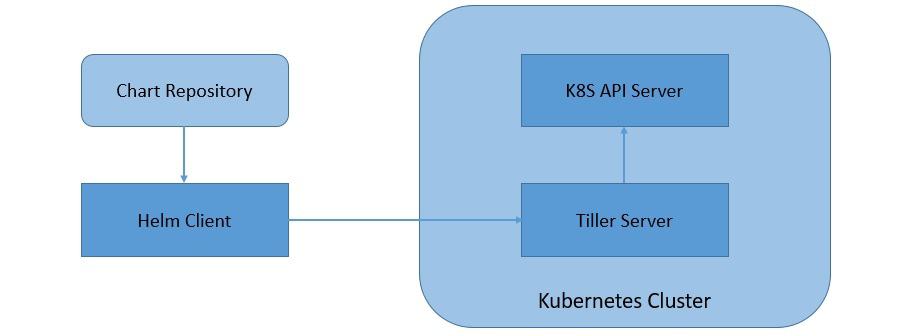
    • Tiller Server: Helm manages the Kubernetes application through Tiller Server installed within a Kubernetes cluster. Tiller interacts with the Kubernetes API server to install, upgrade, query, and remove Kubernetes resources.
    • Helm Client: Helm provides a command-line interface for users to work with Helm Charts. It is responsible for interacting with the Tiller server to perform various operations like install, upgrade and rollback charts.

    Helm 3 has moved onto a completely client-only architecture, where the in-cluster server has been removed:

    Helm 3 Architecture

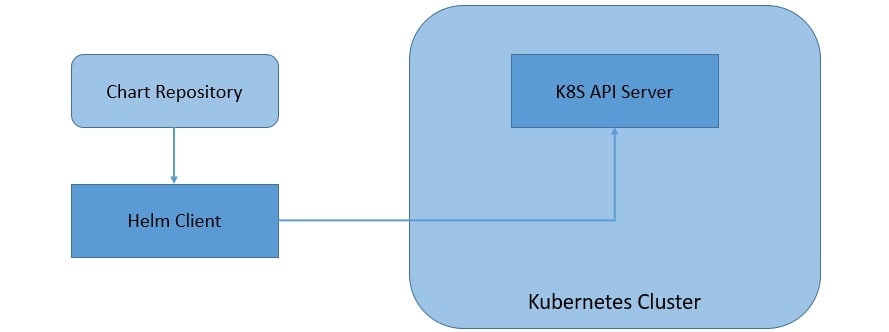
    As we can see, the client in Helm 3 works pretty much the same but interacts directly with the Kubernetes API server instead of the Tiller server. This move has simplified the architecture of Helm and allowed it to leverage the Kubernetes user cluster security.

    4. Helm Charts, Releases, and Repositories

    We'll see more about charts and the changes in Helm 3 as we create them shortly. But for now, a chart is nothing but a set of information necessary to create a Kubernetes application, given a Kubernetes cluster:

    • chart is a collection of files organized in a specific directory structure
    • The configuration information related to a chart is managed in the configuration
    • Finally, a running instance of a chart with a specific config is called a release

    Helm 3 also introduced the concept of library charts. Basically, library charts enable support for common charts that we can use to define chart primitives or definitions. This can help to share snippets of code that we can re-use across charts.

    Helm tracks an installed chart in the Kubernetes cluster using releases. This allows us to install a single chart multiple times with different releases in a cluster. Until Helm 2, releases were stored as ConfigMaps or Secrets in the cluster under the Tiller namespace. Starting with Helm 3, releases are stored as Secrets by default in the namespace of the release directly.

    Finally, we can share charts as archives through repositories. It is basically a location where packages charts can be stored and shared. There is a distributed community chart repository by the name Artifact Hub where we can collaborate. We can also create our own private chart repositories. We can add any number of chart repositories to work with.

    5. Prerequisite: Install K3s

  5. Helm

    Let’s get this out of the way. This is the easy stuff. We are going to pretty much follow the official guide, since Helm supports arm64. https://helm.sh/docs/intro/install/

    More info about Helm 3: https://helm.sh/docs/

    #Make sure GIT is installed
    apt -y install git
    #We need to fix kubeconfig file for helm to stop complaining
    export KUBECONFIG=~/.kube/config
    mkdir ~/.kube 2> /dev/null
    sudo k3s kubectl config view --raw > "$KUBECONFIG"
    chmod 600 "$KUBECONFIG"
    echo "KUBECONFIG=$KUBECONFIG" >> /etc/environment
    #Switch to home directory
    cd
    #Create a directory for helm
    mkdir helm
    #Switch to helm directory
    cd helm
    #Download helm installer
    curl -fsSL -o get_helm.sh https://raw.githubusercontent.com/helm/helm/main/scripts/get-helm-3
    #change permissions to execute
    chmod 700 get_helm.sh
    #install helm
    ./get_helm.sh
    #check if helm is installed
    root@control01:~/helm# helm version
    version.BuildInfo{Version:"v3.11.0", GitCommit:"472c5736ab01133de504a826bd9ee12cbe4

Monday, 10 July 2023

How to Setup Jenkins Pipeline Environment Variables(Tutorial)


How to Setup Jenkins Pipeline Environment Variables. Jenkins is an open-source automation server. It helps automate the parts of software development related to building, testing, and deploying, facilitating continuous integration and continuous delivery. It is a server-based system that runs in servlet containers such as Apache Tomcat. In addition, it supports version control tools, including AccuRev, CVS, Subversion, Git, Mercurial, Perforce, ClearCase, and RTC. It can execute Apache Ant, Apache Maven, and sbt based projects and arbitrary shell scripts, and Windows batch commands.

Jenkins Environment Variable is a global variable exposed through the env variable and used anywhere in the Jenkins file. Any value stored in the env variable gets stored as a String type. Environment Variables can be set either at the pipeline top level, at the specific stage level, or inside the script block.


Another way of explaining Environment variables are like global key value pairs Jenkins can access and use in project. When using Jenkins environment variables we can avoid having to code the same values for each project. Other benefits of using Jenkins environment variables include improved security. 

In this article, we will learn how to setup Jenkins Pipeline Environment Variables.

Listing Environment Variables

Let us start by listing all environment variables. Every Jenkins installation has this page called env-vars.html; if you open it in your Jenkins installation, you will see this list of environment variables with some short explanation. You can find variables like BUILD_ID, JOB_NAME, JOB_BASE_NAME, BUILD_URL, JENKINS_URL, and a few others.


Although it would not be the complete list, we can see some of these variables in the pipeline. Let us create a simple stage in our pipeline where we will call print and sort alphabetically. Then, we can apply this and run our pipeline to see the list of all available variables in that specific Jenkins instance.

pipeline{
	agent any

	stages{
		stage("List env vars"){
			steps{
				sh "printenv | sort"
			}
		}
	}
}

Accessing Environment Variables

To access the environment variables, we can add a new stage. We can start using env variables from the groovy interpreter site to pass a groovy string in an echo step, and I want to display the build number. So, in this case, we can use the groovy variable inside the groovy string and if you want to display BUILD_NUMBER.

pipeline{
	agent any

	stages{
		stage("List env vars"){
			steps{
				sh "printenv | sort"
			}
		}
		stage("Using env vars"){
			steps{
				echo "BUILD_NUMBER = ${env.BUILD_NUMBER}"
sh 'echo BUILD_NUMBER = $BUILD_NUMBER'

			}
		}
	}

}

One thing worth mentioning is that the env. is optional. However, it is good practice to make this information explicit to know that this BUILD_NUMBER  is expected to be taken from environment variables. Here we are using double quotes, so groovy will do its interpolation; its groovy variable will be interpolated in this place.

We can also use those env variables in the shell process. However, keep in mind that we want to use single quotes for simplicity because we want to do some echo like a BUILD_NUMBER, and we can access it with the ‘$’ sign. Therefore, there is no env prefix in the second line; as you can see, that is just shell environment variable access.

Setting Environment Variable

There are multiple ways to set the environment variables.

Setting Global Environment Variable

There is a block called environment, and we can put it at the top pipeline level. Any environment defined at this level will be available at any stage in this pipeline. For instance, if you want to define USER_NAME = Joe and USER_ID = 42. Now we can use these environment variables in any stage, say in the second stage.

pipeline{
	agent any

	environment{
		USER_NAME = "Joe"
		USER_ID = 42
}
	stages{
		stage("Using env vars"){
			steps{
				Echo "BUILD_NUMBER = ${env.BUILD_NUMBER}"
sh 'echo BUILD_NUMBER = $BUILD_NUMBER'

				echo "Current user is ${env.USER_NAME}"
			}
		}
	}

}

One thing that is worth mentioning is when it comes to setting environment variables. Every environment variable is always cast to string. So even though we set 42 as an integer value,  the USER_ID is a string value. You can run the following code to check the type of environment variable:

pipeline{
	agent any

	environment{
		USER_NAME = "Joe"
		USER_ID = 42
}
	stages{
		stage("Using env vars"){
			steps{
				echo "BUILD_NUMBER = ${env.BUILD_NUMBER}"
sh 'echo BUILD_NUMBER = $BUILD_NUMBER'

				echo "Current user is ${env.USER_NAME}"
				echo "Current user id is ${env.USER_ID} type: ${env.USER_ID.class}"
			}
		}
	}

}

Setting Stage Level Environment Variable

We can define the environment block at the stage level. For example, if we want to define the user path of Joe, we can do it as follows:

pipeline{
	agent any

	stages{
		stage("Using env vars"){
			environment{
				USER_PATH = "/home/joe"
}
			steps{
				echo "Current user path is ${env.USER_PATH}"
			}
		}
	}

}

Next with how to Setup Jenkins Pipeline Environment Variables  the guide explains another way to set the environment variable. It is by using the env variable directly in the script block. We can define, let us say, USER_GROUP and display it. You will see that the underlying shell also has access to this environment variable.

pipeline{
	agent any

	stages{
		stage("Using env vars"){
			steps{
				script{
					env.USER_GROUP = "users"

}

sh 'echo Current user group is $USER_GROUP'
			}
		}
	}

}

You can also set an environment variable using withEnv block. We can define a list of environment variables as strings.

pipeline{
	agent any

	stages{
		stage("Using env vars"){
			steps{
withEnv(["USER_PWD=secret", USER_IS_ADMIN=false]){
	echo "Current user password is ${env.USER_PWD}"
	sh 'echo Current user is admin? $USER_IS_ADMIN'
}
		}
	}
}

Overriding Environment Variable

We can override environment variables, but there are some limitations to it. Any variable defined in the pipeline environment block can be overridden in the local stage environment. We can check this by overriding the USER_ID to 32, and this variable will override the variable from the pipeline level environment.

However, if you try to override USER_NAME with script block and direct access to the env variable to “Adam,” it would not work. We can see it by moving the echo command for USER_NAME.

pipeline{
	agent any

	environment{
		USER_NAME = "Joe"
		USER_ID = 42
}
	stages{
		stage("Using env vars"){
			environment{
				USER_ID = 32
}
			steps{
				echo "Current user id is ${env.USER_ID} type: ${env.USER_ID.class}"
				script{
					env.USER_NAME = "Adam"
}
				echo "Current user is ${env.USER_NAME}"

			}
		}
	}
}

There is one way to override any variable, and this is with the withEnv block. So, for instance, if we define USER_NAME to Bob, we could see this new user name. But of course, its scope would be limited because this USER_NAME “Bob” exists only in this specific scope.

pipeline{
	agent any

	environment{
		USER_NAME = "Joe"
		USER_ID = 42
}
	stages{
		stage("Using env vars"){
			environment{
				USER_ID = 32
}
			steps{
				echo "Current user id is ${env.USER_ID} type: ${env.USER_ID.class}"


withEnv(["USER_NAME=Bob"]){

			echo "Current user is ${env.USER_NAME}"
}
			}
		}
	}
}


Using Environment Variable as Boolean

Next section of how to Setup Jenkins Pipeline Environment Variables is when we know every env variable is of string type, we need to be careful to store Boolean. For example, we want to control the execution of the next stage with some env variable; we can call it TRIGGER_NEXT. Then we will add a new stage, “something” when the block uses expression to define if this stage should be executed or not, and we would execute it only if TRIGGER_NEXT is true.

We must use the toBoolean() command to convert the string “true” to a boolean value.

pipeline{
	agent any

	stages{
		stage("Something"){
			when {
				expression{
					env.TRIGGER_NEXT.toBoolean() = true
}
}
steps{
echo "OK!"
}
}
	}
}

How to Setup Jenkins Pipeline Environment Variables Conclusion

After reading this tutorial, you should be able to setup Environment Variables , list and Access variables as well as use the variable as Boolean.

Jenkins can help you deliver a flawless final product on schedule when working on multiple projects

How to upgrade Maven

  java.lang.IllegalStateException I had installed maven in my ubuntu using command  apt install maven This installed maven in path /usr/shar...